YouTube Crochet Inspirations: Channels to Follow

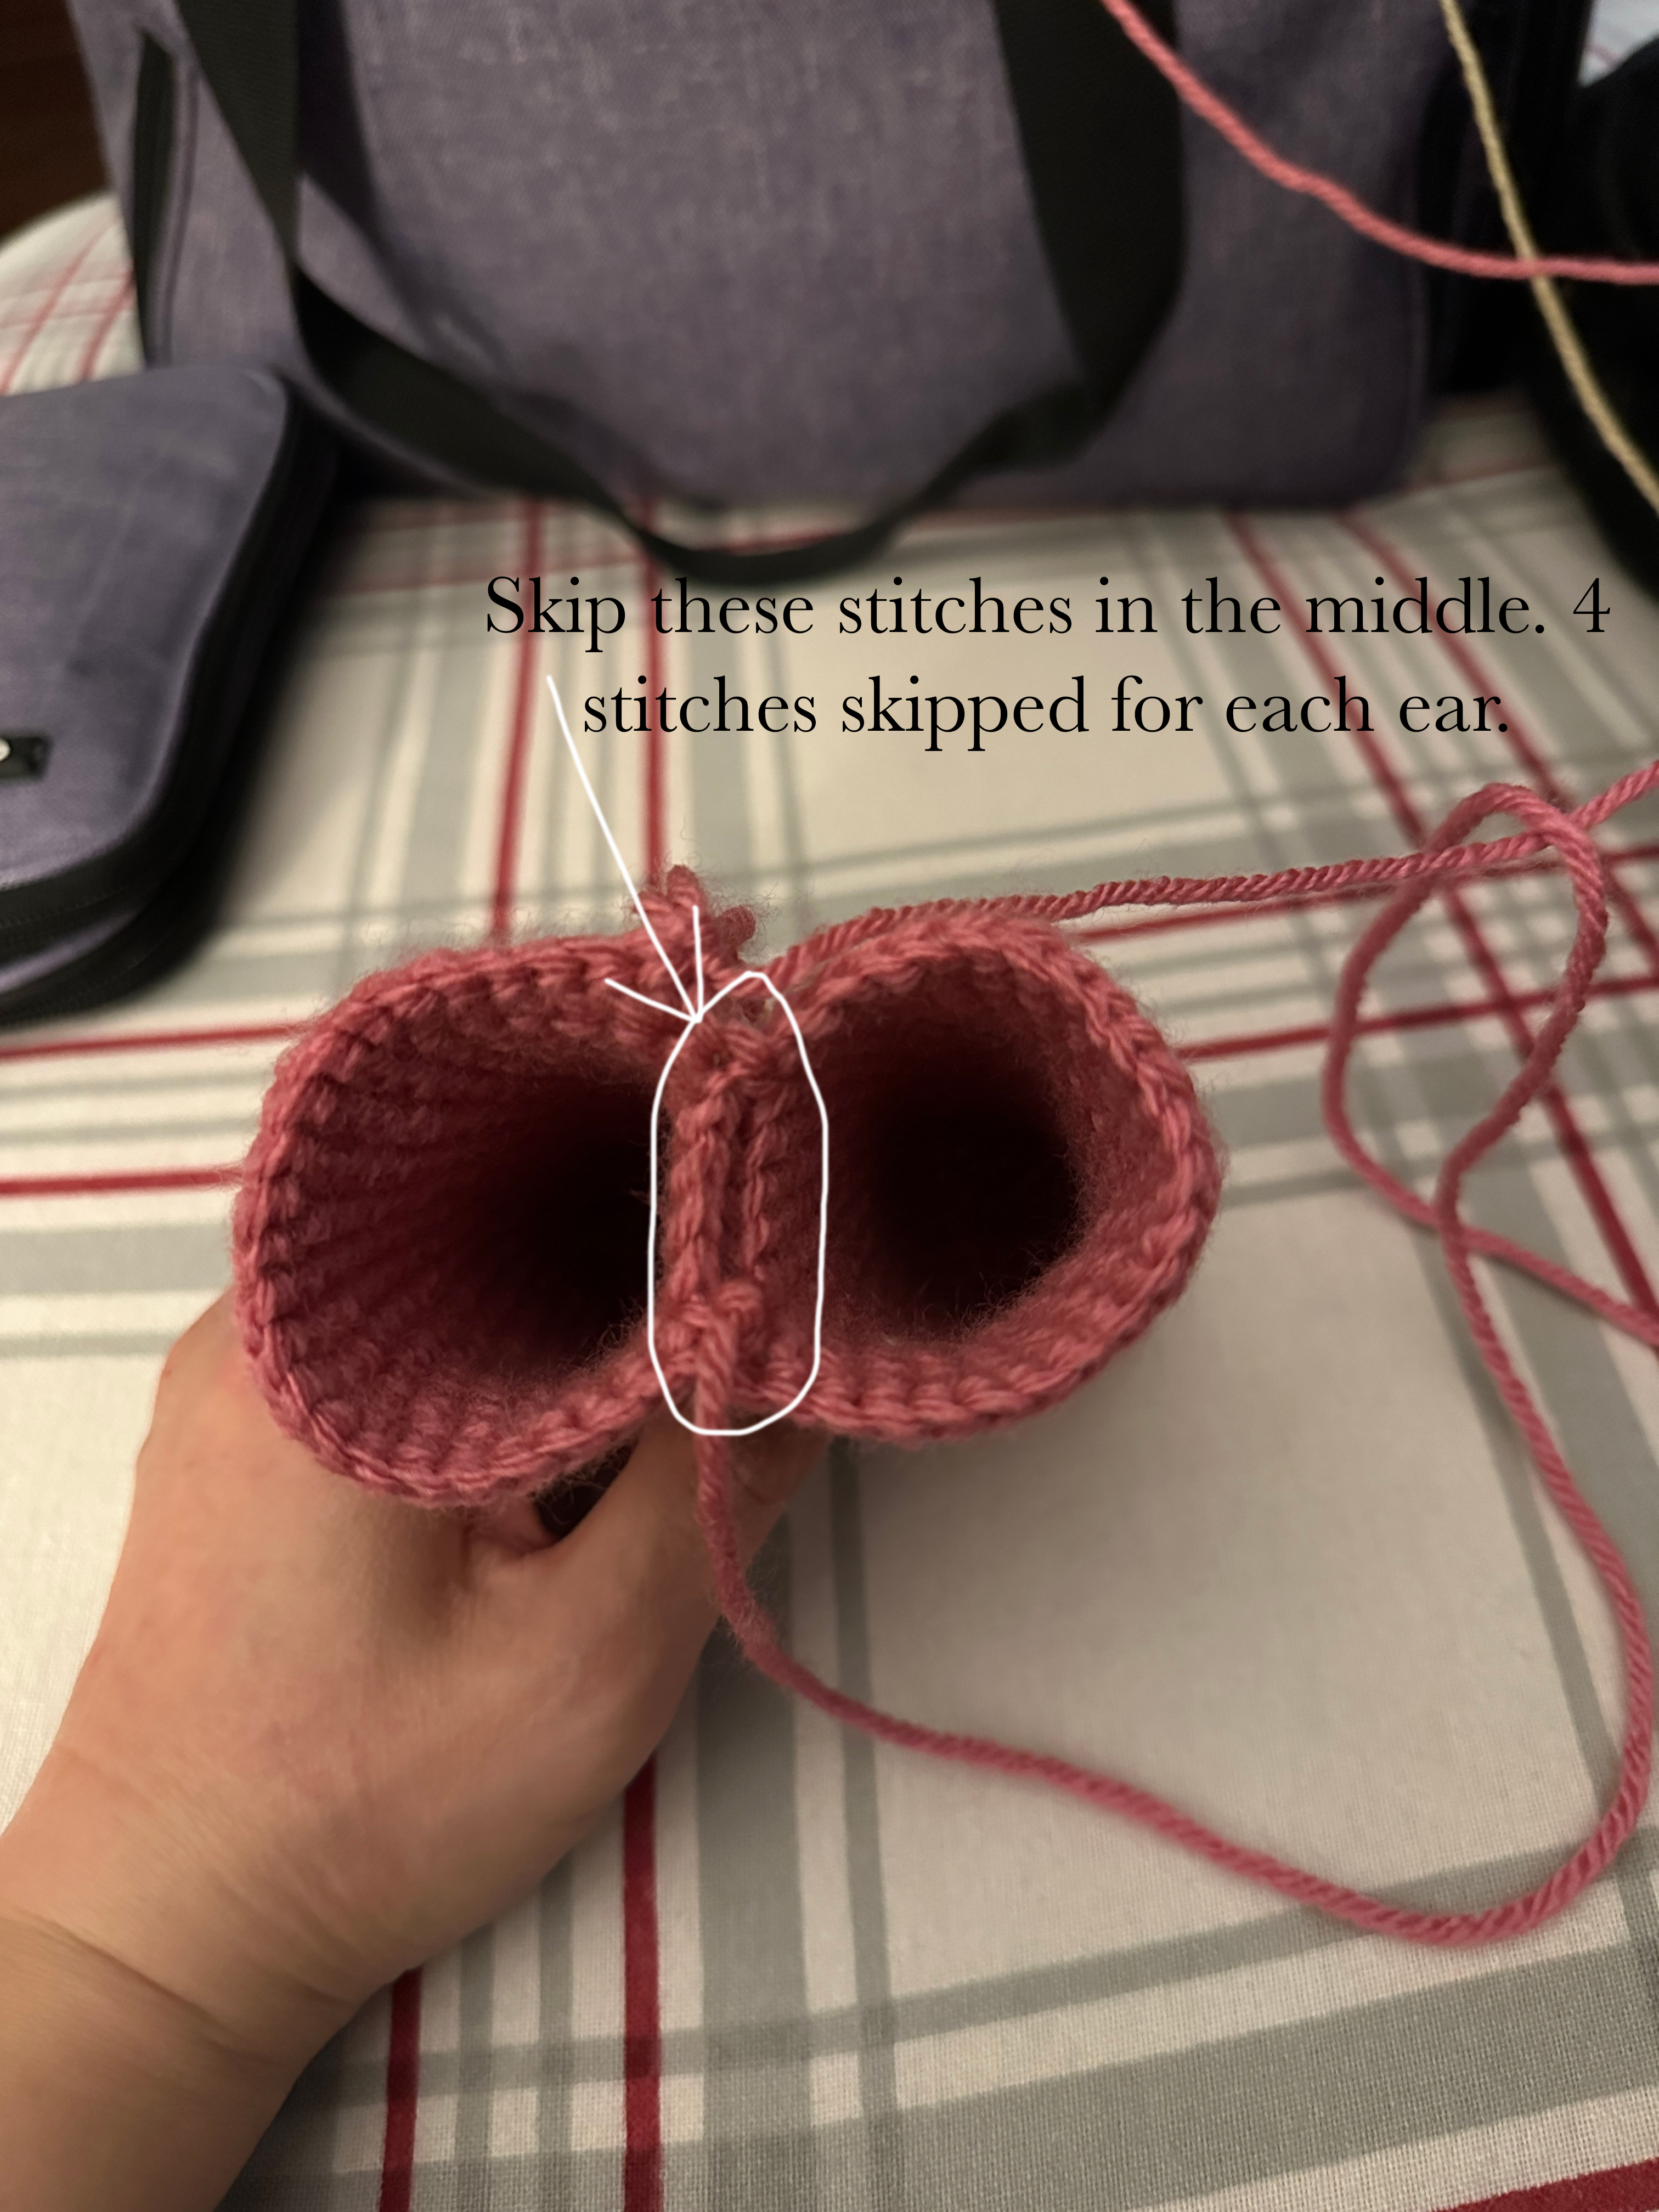
Recently I have been watching more and more crochet market vlogs and crochet studio vlogs. But let’s backtrack to the beginning of this year in January. I was asked, along with other small business owners, to apply to sell our items in their cafe shop. I had sold my items there before so I gladly said yes. Several day went by and I had started to make some inventory because I didn’t have anything. I don’t normally sell my items in my Etsy shop so I didn’t have anything made. So I frantically started crocheting bubble tea keychains. I also started going on line for more ideas. I’m not sure how I came across it but I happened upon someone who made something with chunkier yarns. In the past I stayed away from these because they were very expensive. They cost twice or three times as much as Red Heart Super Saver. Many times I would buy Red Heart on sale and it was a great deal.

So I finally caved and ordered several skeins of Premier Parfait Chunky. They were so soft and amazing to crochet with but I went through them very fast. I also tried out Bernat Blanket. Oh and to finish my story about the cafe shop, I was turned down so I had this extra inventory I had to sell. I also bought so much extra yarn. I wanted to make my money back so I decided to make more dolls to recoup my losses. I was planning on doing a market this year, sometime in the Fall or Winter but I already spent so much on yarn that I didn’t have enough to get packaging, a tent, display items and other things I needed to make my booth look nice. Meanwhile I started watching market videos on YouTube. I had seen one crocheter (madewithapril) make crocheted flowers and I thought I would try to attempt it. Crochet flowers were actually the ones I wanted to initially make for the cafe. I bought the wire and everything. So now I’m left with a whole bunch of wire that I have to use. Crocheting flowers is pretty easy but taxing on my hands. I only created a few. I might make more in the future but my 41 year old hands need a rest.

So I continued to grow my inventory and started watching market videos/vlogs. From Instagram, I found madewithapril. Her video style is so down-to-earth that I continued watching her other videos as well. Then I went on to watch many other videos from amazing YouTubers who don’t get quite as many subs and views as they should. Here I want to list the YouTubers I really enjoyed watching. They’re videos are so informative and friendly. They’re cozy vibes really makes them a wonder to watch and listen to.

I want to start with Made With April. She’s already got quite a following and her videos are amazing. I posted all the channels below. Just click on the image to go to their YouTube page.

How to Crochet a Sackboy: Step-by-Step Guide

Key:

Rnd – Round
FO – Finish Off
St – Stitch
Sc – Single Crochet
Inc – Increase meaning 2sc in one stitch
Dec – Decrease meaning crocheting 2 stitches together
BLO – Back Loop Only

Materials:

  1. 1 skein of medium worsted yarn. I used Red Heart Super Saver in Coffee.
  2. 4mm hook. I used the Tulip brand.
  3. Darning needle. I used Clover Chibi.
  4. Scissors. I used two kinds, one for the yarn and a sturdy large one for the zipper.
  5. A zipper of your choice. I got mine off of Amazon.
  6. Black shank buttons.
  7. Thread to help you put yarn through the back of the buttons

Head:

Rnd 1. 6sc in magic circle. (6)
Rnd 2. Inc x 6. (12)
Rnd 3. (1sc. Inc.) x 6. (18)
Rnd 4. (2sc. Inc.) x 6. (24)
Rnd 5. (3sc. Inc.) x 6. (30)
Rnd 6. (4sc. Inc.) x 6. (36)
Rnd 7. (5sc. Inc.) x 6. (42)
Rnd 8. (6sc. Inc.) x 6. (48)
Rnd 9. BLO. 48sc. (48)
Rnd 10-14. 48sc. (48)
Rnd 15. (7sc. Inc.) x 6. (54)
Rnd 16-19. 54sc. (54)
Rnd 20. (2sc. Dec.) x 13. 2sc. (41)
Rnd 21. (1sc. Dec.) x 13. 2sc. (28)
Rnd 22. (1sc. Dec.) x 9. 1sc. (19)
Rnd 23. (1sc. Dec.) x 6. 1sc. (13)
Rnd 24. 12sc. We are skipping the last stitch. (12)
Rnd 25. Chain 1. Inc x 12. (24)
Rnd 26-32. Chain 1. 24sc. (24)
Rnd 33. Chain 1. (7sc. Inc.) x 3. (27)
Rnd. 34-36. Chain 1. 27sc. (27)

At this point sew the zipper on. Make sure that your zipper is the right size. If it’s not the right size, cut it shorter. I used a backstitch to sew it on.

Rnd 37. BLO. Dec x 13. 1sc. (15)
Rnd 38. Dec x 7. 1sc (9)
Rnd 39. Dec x 3. (6)

Finish off here and sew any gap closed. Weave in the ends.

Hands (make 2):

Start with the fingers. There will be 10 fingers in total. The thumb will be 1 row less than the rest of the fingers.

Rnd 1. 4sc in magic circle. (4)
Rnd 2-5. 4sc. (4)

Finish off for the first 3 fingers. Do not finish off for the fourth finger because you will continue to crochet onto the other fingers from here. Please watch the video for more clarity. Take any finger and crochet 2sc. Then take another finger and crochet 2sc. Take the last finger and crochet 4sc. Then continue onto the next finger as you crochet around the hand. Crochet into the next 6sc. You should have a total of 16 stitches. This is Rnd 6. Place a marker here.

Rnd 7. 16sc. (16)
Rnd 8. This is where you connect the thumb. The thumb is the same as the other fingers but with one less row. Continue to crochet onto the thumb with 4sc. You should have a total of 20sc. Do 1sc to completely join the thumb. Add a marker here.
Rnd 9. 20sc.
Rnd 10. 20sc.
Rnd 11. (2sc. Dec.) x 5. (15)
Rnd 12. (3sc. Dec.) x 3. (12)
Rnd 13-19. 12sc. (12)

Stuff the arm. Flatten the arm. See what this looks like in the video. Crochet both layers together. Chain 1. 6sc. FO. Then sew the arm onto the body with a whip stitch at Rnd 24 of the head/body. Position the arm about 3 stitches away from the zipper.

Leg (make 2):

Rnd 1. 8sc in magic circle. (8)
Rnd 2. Inc x 8. (16)
Rnd 3. BLO. 16sc. (16)
Rnd 4-8. 16sc. (16)
Rnd 9. (6sc. Dec.) x 2. (14)
Rnd 10-13. 14sc. (14)

Stuff the leg. Flatten the leg like you did with the arm. Chain 1. 7sc through both layers. FO and sew onto the body. Sew the leg on the BLO row of the body at the bottom. Make sure that the leg lines up with the arm.

For the eyes, please see the video for clearer instructions. Position the middle of the buttons 10-11 stitches apart. Insert them between Rnds 14 and 15 of the head. The total height of your doll is approximately 9.5 inches.

How to Make My Melody

A couple of weeks ago I posted something about my daughter’s 1st birthday. It’s a bunny theme and I decided to make little bunnies for party favors. I also made a My Melody for her. I’ve decided to give this pattern for free here on my website.

Materials:

  1. Medium worsted yarn. I used Red Heart Super Saver. Pink, purple, gold, brown, white and cream colors.
  2. Stuffing
  3. Darning needle
  4. Scissors

Ears (Make 2) and Body:

  1. With pink color. 6sc in magic circle. (6)
  2. 2sc in each st. (12)
  3. (1sc in st. 2sc in st.) x 6. (18)
  4. (1sc in next 2st. 2sc in st.) x 6. (24)
  5. 1sc in each st. For 23 rows. See Figure 1. (24)
  6. Connect the 2 ears together. Make sure that you skip 4 stitches from each ear. So you are skipping a total of 8 stitches. This video will show you what I mean by connecting the ears together: https://www.youtube.com/watch?v=V7t7KPY50tk&ab_channel=GoldenJellyBean. See figure 1, 2 and 37. Sew the gap between the ears closed. (40)
  7. (1sc in next 3st. 2sc in st) x 10. (50)
  8. (1sc in next 4st. 2sc in st) x 10. (60)
  9. 1sc in each st for 5 rows. (60)
  10. Crochet until you have about 5 stitches away from the end of the row. Fold your work in half as shown in Figure 5. Each half (front and back) should have 30 stitches each. You will be changing color to cream. The middle of the front should have 10 stitches of white. If you would like to follow what I did for mine, the last stitch from the last row was cream. Then the rest of the 9 cream stitches started the next row. Then do this: (1sc in next 4st. 2sc in st.) x 9. 1sc in the next st. Change to cream. 1sc in next 4st. See Figures 6-9.
  11. 1sc in next 12st. Change to pink. 1sc in the next 50st. Change to cream. 1sc in next 7st.
  12. 1sc in next 15st. Change to pink. 1sc in next 47st. Change to cream. 1sc in next 7st.
  13. 1sc in next 15st. Change to pink. 1sc in the next 47st. Change to cream. 1sc in next 7st.
  14. 1sc in the next 15st. Change to pink. 1sc in next 47st. Change to cream. 1sc in next 7st.
  15. 1sc in the next 15st. Change to pink. 1sc in next 48st. Change to cream. 1sc in next 6st. 
  16. 1sc in next 16st. Change to pink. 1sc in next 47st. Change to cream. 1sc in next 6st.
  17. 1sc in next 16st. Change to pink. 1sc in next 48st. Change to cream. 1sc in next 5st.
  18. 1sc in next 15st. Change to pink. (1sc in next 3st. Sc2tog.) x 9. 1sc in next 5st. Change to cream. 1sc in next 4st.
  19. 1sc in next 15st. Change to pink. (1sc in next 8st. Sc2tog.) x 4. 1sc in next 2st. Change to cream. 1sc in next 3st.
  20. 1sc in next 14st. Change to pink. (1sc in next 4st. Sc2tog.) x 6. 1sc in next 6st.
  21. Change to cream. (1sc in next 4st. Sc2tog.) x 2. Change to pink. (1sc in next 4st. Sc2tog.) x 6. 1sc in next 2st. (42)
  22. (1sc in next 4st. Sc2tog) X 6. (36)
  23. (1sc in next 3st. Sc2tog.) x 6 (30)
  24. (1sc in next 2st. Sc2tog.) x 6 (24)
  25. Change to cream. 2sc in each st. (48)
  26. 1sc in each st. For 10 rows. 
  27. FO. Make the legs.
  28. After finishing the legs, sew them onto the body as shown in the pictures. See Figures 13-16.

Legs (Make 2):

  1. With cream color. 6sc in magic circle. (6)
  2. 2sc in each st. (12)
  3. (1sc in st. 2sc in st.) x 6 (18)
  4. (1sc in next 2st. 2sc in st.) x 6 (24)
  5. (1sc in next 7st. 2sc in st.) x 3. (27)
  6. 1sc in each st. For 16 rows. (27)
  7. (1sc in st. Sc2tog.) x 9 (18)
  8. Sc2tog x 9. (9)
  9. Sc2tog x 3. Sew gap closed.
  10. Sew the legs together as shown in Figures 11 and 12.
  11. Then sew the legs onto the body as shown in Figures 13-16.

Arms (Make 2):

  1. With cream color. 6sc in magic circle. (6)
  2. 2sc in each st. (12)
  3. (1sc in st. 2sc in st.) x 6 (18)
  4. 1sc in each st. For 7 rows. (18)
  5. (1sc in next 4st. Sc2tog.) x 3 (15)
  6. 1sc in each st. For 3 rows.
  7. (1sc in next 3st. Sc2tog.) x 3 (12)
  8. 1sc in each st. For 3 rows.
  9. (1sc in next 2st. Sc2tog) x 3 (9)
  10. (1sc in st. Sc2tog.) x 3 (6)
  11. FO. Sew gap closed.
  12. Sew arms on, making sure to put the smaller part at the top. See Figures 18 and 19.

Hat Collar (this part goes around her neck):

  1. With pink color. Chain 28.
  2. 1sc in each chain starting in the second chain from the hook. (27)
  3. Chain 1. Turn. 1sc in each st. (27)
  4. Chain 1. Turn. (1sc in next 8st. 2sc in st.) x 3 (30)
  5. Chain 1. Turn. (1sc in next 5st. 2sc in st.) x 6 (36)
  6. Chain 1. Turn. 1sc in each st. Do this for 2 rows. Sew around her neck. See Figures 21-23.

Fold one of the ears down and sew it to secure it. See Figures 24 and 25.

Flower:

  1. We will first make the petals. Use purple color. 6sc in magic circle. (6)
  2. 1sc in each st. (6)
  3. 2sc in each st. (12)
  4. 1sc in each st. (12)
  5. (1sc in st. 2sc in st.) x 6 (18)
  6. 1sc in each st. For 3 rows. (18)
  7. (1sc in st. Sc2tog.) x 6. (12)
  8. Sc2tog x 6. (6)
  9. Sew gap closed. Do not stuff.
  10. Make 5 other petals. Then sew them together. See Figures 26 and 27.
  11. For the middle part of the flower, use gold color. 6sc in magic circle. (6)
  12. 2sc in each st. (12)
  13. FO. Then sew this onto the middle of the flower (Figure 28). Sew the flower onto her head. I placed my flower on the side of the folded ear (Figures 35 and 36).

Face:

  1. Use brown yarn to embroider her eyes. I used white at the corners of her eyes to make them more alive.
  2. Use gold yarn to embroider her nose.
  3. Finally, use brown yarn to embroider her mouth.
  4. Use the images as a guide for what shapes to make the eyes, nose and mouth. See Figures 29-34.

How to Make Shinbi from Haunted House

There aren’t many shows I would let my kids watch all the time. Many are pretty generic. Many have questionable content. Haunted House (Shinbi Apartment or Sinbiapateu) is a Korean show that was produced by Tooniverse and CJ ENM. It is geared towards kids and don’t actually try to add any adult content like many movies and shows out there. This show is actually for children and my kids love it. I love this show too so naturally I had to make Shinbi. He is a powerful goblin from the show. The free video tutorial is available. If you would like the pattern it is here in my shop: Shinbi Pattern.