Shawls, Bags and a Cardigan, Oh My!

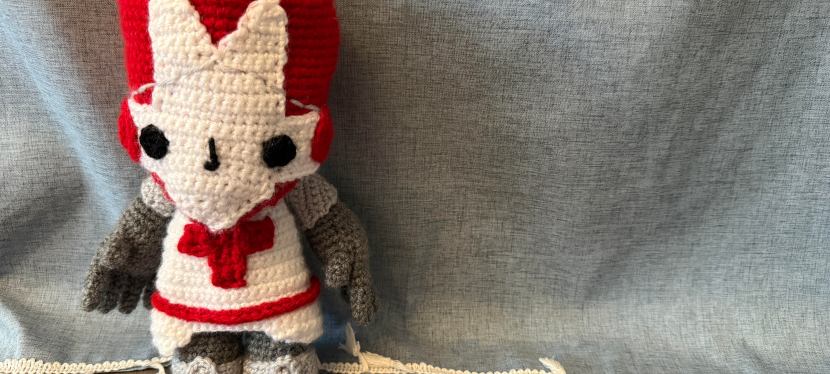
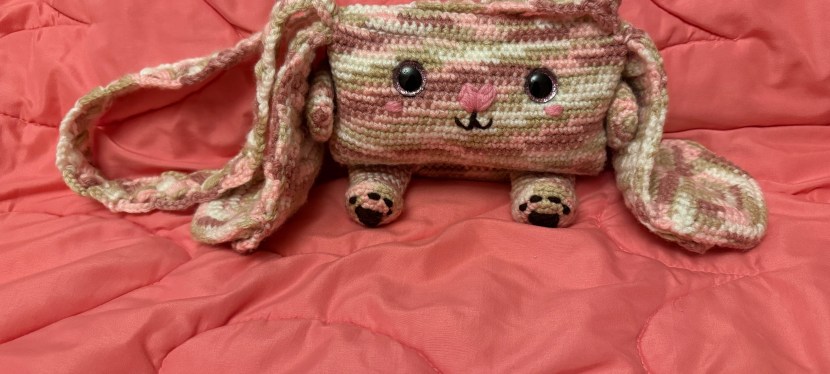
If you’ve been following me on YouTube you have probably heard me talk about my obsession with bags and shawls. I have been into making bags lately and it’s been fun. The last bag I finished was my daughter’s bunny bag. The video for the finished bag with be up this Friday. I don’t have a tutorial for it so it’s a pretty chill, grab your WIP kind of video. The first bag of 2025 was this granny square bag.

If you saw my short, I was in the process of making the Rebecca cardigan from This is Us and I totally made the wrong granny squares. They weren’t even close to being what they looked like on the cardigan. I made traditional granny squares and the cardigan required a type of sunburst granny square. I filmed myself crocheting the square for each round and then I just didn’t have the time to film because I had other videos to post. I might make another video showing you how to make one. It’s not my pattern because all I did was look at a picture and figure out how to make it. I didn’t buy the pattern but if you want to, it’s available on Etsy. Just search for the Rebecca cardigan pattern and you will find it. The squares I made were the wrong ones so I decided to make a bag out of them.

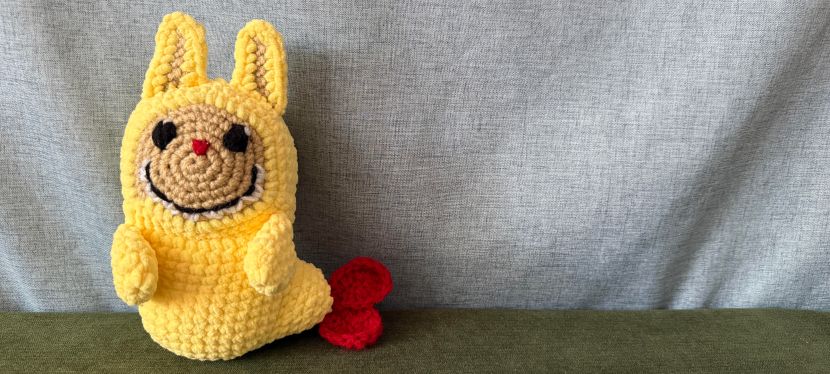
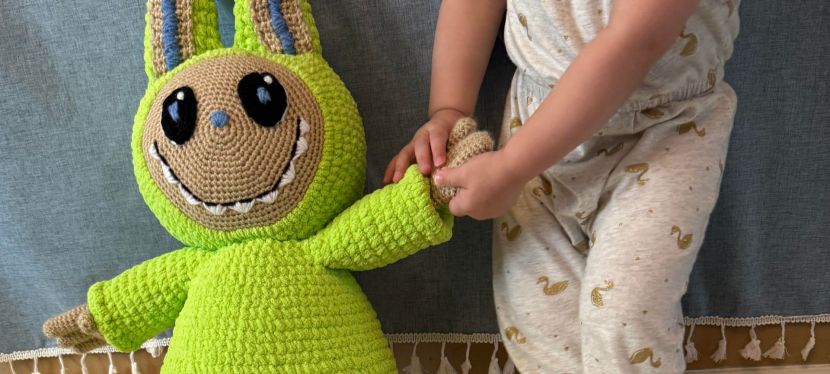
After that I made this bag as a homage to the Sackboy doll who made my whole YouTube channel possible. I made him into a bag and it doesn’t carry much but he’s cute to carry around. My son can put his cars and small toys in it.

Next I finished the bunny bag which was my most detailed bag this year. If you have any suggestions on what bags to make next please let me know. I have a plan for my next one which is related to an upcoming movie in September.

So the shawls I have been making are pretty fun but takes a while to finish just like any wearable. The first one is this one: https://mijocrochet.se/2016/11/23/secret-paths-sjal-shawl/ The pattern is very easy to follow and its very pretty. I used Red Heart Melange. It’s ok to work with. It’s not consistent in the weight. There are some parts that are fuzzy and then thin. I like the over all look but it’s not the easiest to work with. I can’t just pull a whole lot of it when crocheting because it twists when it’s unraveled. Frogging it is also a pain. The yarn tends to grab onto itself and gets stuck when you have to start over a part of your work. This is probably the last shawl I will make with this particular yarn. The next shawl I started (Yes, my WIPs are slowly growing. I get really impatient so I start more while I’m working on one.) is going to be in Lion Brand’s Mandala. It soft and very nice to work with so far. I will give my final thoughts when I have worked up a little more of the scarf. I’m following this video for it: https://www.youtube.com/watch?v=fxvhTUGWM0U&t=12s&ab_channel=HookedbyRobin . It’s a lightweight one and it seems a little more lacey than the first one I’m working on. I’m just really excited for Fall and Winter!! I can’t wait to finish my shawls and cardigan and finally use them. How about you guys? What are you working on? Please leave a comment and I hope you are having a great day 🙂

New Castle Crasher Pattern

Materials:

  1. Red Heart Super Saver in white, black, red, cream, brown, grey and light grey
  2. Darning needle
  3. Size 3.5mm hook
  4. Scissors
  5. Stuffing

Helmet:

Rnd 1. With red color.
Rnd 2. Inc x 6. (12)
Rnd 3. (1sc. Inc.) x 6. (18)
Rnd 4. (2sc. Inc.) x 6. (24)
Rnd 5. (3sc. Inc.) x 6. (30)
Rnd 6. (4sc. Inc.) x 6. (36)
Rnd 7. (5sc. Inc.) x 6. (42)
Rnd 8. (6sc. Inc.) x 6. (48)
Rnd 9. (7sc. Inc.) x 6. (54)
Rnd 10. (8sc. Inc.) x 6. (60)
Rnd 11-27. 60sc. (60)
FO.

White face on helmet:

Row 1. Chain 2.
Row 2. 3sc in sc starting in the second chain from the hook. (3)
Row 3. Inc x 3. (6)
Row 4. Chain 1. Turn. 6sc. (6)
Row 5. (1sc. Inc.) x 3. (9)
Row 6. (2sc. Inc.) x 3. (12)
Row 7-12. Chain 1. Turn. 12sc. (12)
Follow the video for the rest of the white face.
Sew this part onto the helmet.

Eyes (Make 4):

Rnd 1. Use black color. 6sc in magic circle. (6)
FO. Sew onto the face. You can embroider white dots in the eyes if you want but this is optional. This pattern is for the eyes for the helmet and the face.

Side circles for the helmet (Make 2):

Rnd 1. Use grey color. 6sc in magic circle. (6)
Rnd 2. Inc x 6. (12)
Rnd 3. (1sc. Inc.) x 3. (15)
FO. Sew onto the side of the helmet as shown in the video.

Embroider the grey lines on the helmet. Also embroider the mouth with black color.

Head into the body:

Rnd 1. With cream color. 6sc in magic circle. (6)
Rnd 2. Inc x 6. (12)
Rnd 3. (1sc. Inc.) x 6. (18)
Rnd 4. (2sc. Inc.) x 6. (24)
Rnd 5. (3sc. Inc.) x 6. (30)
Rnd 6. (4sc. Inc.) x 6. (36)
Rnd 7. (5sc. Inc.) x 6. (42)
Rnd 8. (6sc. Inc.) x 6. (48)
Rnd 9. (7sc. Inc.) x 6. (54)
Rnd 10-24. 54sc. (54)
Rnd 25. (7sc. Dec.) x 6. (48)
Rnd 26. (6sc. Dec.) x 6. (42)
Rnd 27. (5sc. Dec.) x 6. (36)
Rnd 28. (4sc. Dec.) x 6. (30)
Rnd 29. (3sc. Dec.) x 6. (24)
Rnd 30. (2sc. Dec.) x 6. (18)
Rnd 31. (1sc. Dec.) x 6. (12)
Rnd 32. Inc x 12. (24)
Rnd 33. Change to grey. (2sc. Inc.) x 8. (32)
Rnd 34-45. 32sc. (32)
At this point you can either attach the body now or later. I attached it now because it means less ends to weave in.
Rnd 46. BLO. (2sc. Dec.) x 8. (24)
Rnd 47. (2sc. Dec.) x 6. (18)
Stuff the body.
Rnd 48. (1sc. Dec.) x 6. (12)
Rnd 49. Dec x 6. (6)
FO. Sew gap closed.

Fingers (Make 4):

Rnd 1. 6sc in magic circle. (6)
Rnd 2-6. 6sc. (6)
FO for all the fingers except for the 4th one.
Follow the video for how to attach the fingers together.

Thumb (Make 2):

Rnd 1. 6sc in magic circle. (6)
Rnd 2. Inc. (7)
Rnd 3-5. 7sc. (7)
FO. Sew onto the hand. Make sure that you are sewing this on the opposite sides of the hands. You are sewing the thumb slightly towards the palm side.

After you connect all the fingers, you should have 24 stitches.

Hand:

Rnd 1. This is the round where you connect all the fingers. (24)
Rnd 2-8. 24sc. (24)
Rnd 9. (4sc. Dec.) x 4. (20)
Rnd 10. 20sc. (20)
Rnd 11. (3sc. Dec.) x 4. (16)
Rnd 12. (2sc. Dec.) x 2. (14)
Rnd 13-20. 14sc. (14)
FO. Stuff and sew the gap closed. Then sew the arms to the body as shown in the video.

Legs (Make 2):

Rnd 1. Use grey color. 6sc in magic circle. (6)
Rnd 2. Inc x 6. (12)
Rnd 3. (1sc. Inc.) x 6. (18)
Rnd 4. (2sc. Inc.) x 3. (21)
Rnd 5. BLO. 21sc. (21)
Rnd 6-11. 21sc. (21)
Rnd 12. (5sc. Dec.) x 3. (18)
Rnd 16. (4sc. Dec.) x 3. (15)
Rnd 17. 15sc. (15)
FO. Stuff and sew the gap closed just like in the video.

Shoulder pads (Make 2):

Row 1. With light grey color. Chain 2.
Row 2. 3sc in second chain from the hook. (3)
Row 3. Chain 1. Turn. Inc x 3. (6)
Row 4. Chain 1. Turn. (1sc. Inc.) x 3. (9)
Row 5. Chain 1. Turn. (2sc. Inc.) x 3. (12)
Row 6. Chain 1. Turn. (3sc. Inc.) x 3. (15)
Row 7. Chain 1. Turn. (4sc. Inc.) x 3. (18)
Row 8. Chain 1. Turn. (5sc. Inc.) x 3. (21)
Row 9. Chain 1. Turn. (6sc. Inc.) x 3. (24)
FO. Sew onto shoulders as shown in the video.

Shirt:

Row 1. Chain 11.
Row 2. 10sc starting in the second chain from the hook.
Row 3. Chain 1. Turn. (1sc. Inc.) x 5. (15)
Row 4-6. Chain 1. Turn. 15sc. (15)
Row 7. Chain 1. Turn. (2sc. Inc.) x 5. (20)
Row 8-13. Chain 1. Turn. 20sc. (20)
Row 14. (4sc. Inc.) x 4. (24)
Row 15-20. 24sc. (24)
FO.
For the side of the shirt you are going to work on the left and right sides of the shirt. See the video for more instructions. Each side should have 16 stitches. Next:
Row 1. Dec x 2. 8sc. Dec x 2. (12)
Row 2. 12sc. (12)
Row 3. Dec x 2. 4sc. Dec x 2. (8)
Row 4. 8sc.

Shoes (Make 2):

Follow the video for how to make these.

Circles for the shoes (Make 2):

Rnd 1. Use grey color. 6sc in magic circle. (6)
Rnd 2. Inc x 3. (9)
FO. Sew onto the shoes.

Crochet a Tempura Labubu with me!!

Materials:

  1. Red Heart Super Saver in cream, red, white and black
  2. Big Twist Baby Bear in yellow
  3. Darning needle
  4. Size 3.5mm hook
  5. Stuffing
  6. Scissors

You can replace any of the yarn brands with anything you prefer 🙂 I know that Big Twist Baby Bear isn’t available anymore and the alternative is Loops and Threads. I’m not quite sure if they are exact dupes because Erica from  Doseofkawaii  showed that the Big Twist Posh isn’t the exact same as the Loops and Threads Posh Purl. They mention that it is the same on their website but it might not be. Maybe in the future they might change it but for now it’s as good as it’s going to get. Or you can use Premier Parfait Chunky. I love that brand too 🙂

Head:

Rnd 1. Using cream color of Red Heart. 6sc in magic circle. (6)
Rnd 2. Inc x 6. (12)
Rnd 3. (1sc. Inc.) x 6. (18)
Rnd 4. (2sc. Inc.) x 6. (24)
Rnd 5. (3sc. Inc.) x 6. (30)
Rnd 6. (4sc. Inc.) x 6. (36)
Rnd 7. Change to Big Twist Baby Bear in yellow. (5sc. Inc) x 6. (42)
Rnd 8-13. 42sc. (42)
You can stuff the body at this time and along the way as well. But before stuffing, I embroidered the eyes, nose and mouth. I also sewed on their ears before finishing up the head.
Rnd 14. (5sc. Dec.) x 6. (36)
Rnd 15. (4sc. Dec.) x 6. (30)
Rnd 16. (3sc. Dec.) x 6. (24)
Rnd 17. (2sc. Dec.) x 6. (18)
Rnd 18. (1sc. Dec.) x 6. (12)
Rnd 19. Dec x 6. (6)
FO. Sew the gap closed.

Ears:

For the ears, follow the video on how to do that. Use Red Heart in cream for the middle of the ear and Big Twist Baby Bear for the outer portion.

Body:

Rnd 1. Use Big Twist Baby Bear in yellow. In this section you are going to do some surface crocheting. Follow the video for more instructions. In total you are going to have 42 stitches for the body. This will be your first round.
Rnd 2. (12sc. Dec.) x 3. (39)
Rnd 3. (11sc. Dec.) x 3. (36)
Rnd 4-11. 36sc. (36)
I sewed the arms in before finishing up the body. Also stuff the body and along the way.
Rnd 12. (7sc. Dec.) x 4. (32)
Rnd 13. (6sc. Dec.) x 4. (28)
Rnd 14. (2sc. Dec.) x 7. (21)
Rnd 15. (1sc. Dec.) x 7. (14)
Rnd 16. Dec x 7. (7)
FO. Sew gap closed.

Tail end of body:

Rnd 1. Use Big Twist Baby Bear in yellow. Surface crochet this as well. Follow the video. You should have a total of 24 stitches. (24)
Rnd 2. (1sc. Dec.) x 8. (16)
Rnd 3-4. 16sc. (16)
Rnd 5. (2sc. Dec.) x 4. (12)
Stuff this part of the body.
Rnd 6. 12sc. (12)
Rnd 7. Dec x 6. (6)
FO. Sew the gap closed.

Tail:

Use Red Heart in red. Follow the video for instructions.

My Journey Into Making Crocheted Masks

I was tasked to make a mask for a church event. It was our annual cultural event and it usually has a pretty good turn out and amazing food. I was so overjoyed and honored to be asked and then came the worrying. The worrying that I would disappoint every one. The worry that I wouldn’t be as good as everyone expects me to be. The worrying that I’m not actually that talented. But you know what, I remembered one thing. I know what I’m capable of and God works wonders through us. I always forget to pray first before worrying and this just delays any progress. God helped me through and I eventually started working on the first mask.

It was pretty challenging at first. Looking through countless photos and ideas on Pinterest didn’t give me a clue on how to start a crocheted mask that would stay on a person’s face. There was no method or instruction on how to give structure to a mask made out of yarn. So I began with taking a regular sheet of printer paper and printed out a generic mask. Then I traced that out onto cardstock. I then started changing it around to fit my face. There was lot of trial and error on this because these masks had to be sturdy and allow the person wearing it to be able to breath as well. So the masks couldn’t be full face masks.

I’m actually forgetting one crucial piece. I forgot to tell you guys what the theme of the event was. Our Pastor wanted to hold a sort of Masked Singer competition with four contestants from our church. No one was to know who was participating and it was all hush hush. We met at night on zoom for meetings and at night for rehearsals. It was really exciting and so much fun to be a part of it all.

Back to the masks…

Here are the images of what I did for the lion mask. I didn’t take any pictures for the others because I was rushing a little to finish everything and I didn’t even think of pictures at that point. I was asked in January of 2024 and then had to finish sometime in September. Silly me thought that I had so much time. Little did I know I would be rushing until the end. I was too naive to think that I had so much time that I didn’t work fast enough at the beginning and started slacking off.

The snout of the lion was the trickiest. I had to make sure the singer’s face was covered but to also make room for breathing. Don’t ask me how I figured it out. I can’t really tell you what was going on in my head at the time but I just started forming pieces of cardstock and eventually came up with the image above for the final template. I had to make several of these so I put the image into my Cricut and it did the cutting job for me so the shapes were uniform. Thank goodness for the Cricut because at some point I was sooooo done with cutting and the Cricut does such a good job at it.

So then I was thinking that this event was in the Fall but it was still warm at that time. What if they start sweating? I didn’t want the color of the cardstock to transfer onto their faces so I had to think of something. I decided to cut out felt to place on the back of the masks. I hot glued them onto the edges so they would still be comfortable enough to wear for an hour or so.

Then, of course, came the crocheting. I used single crochet for most of the mask. Unfortunately there was no pattern. I just made sure that I fit the shape of the actual mask. This step was definitely tricky but I managed to make the shapes fit. Then I glue those pieces to the top of the mask to cover up the cardstock. I tried to pick a cardstock color that matched the yarn so that if the cardstock was showing, it wouldn’t look too weird.

I had to glue the felt after I shaped the mask so that it wouldn’t be bulky on the back. So the thing I didn’t realize…that the fuzziness of the yarn around the eyes would need to be trimmed. One of the singers wore it and it was poking her eyes. I felt so bad. I started cutting the pieces of yarn fibers so they wouldn’t poke her and make her uncomfortable. Since this mask was the first I made, the yarn around the eyes got a little more worn than the others.

Unfortunately, I don’t have any other pictures. I just have pictures of the finished masks. These were definitely a labor of love. So I didn’t mention before but I did have the choice to do anything I wanted for the masks. I had free reign on what the masks would look like. I could have done something abstract. I didn’t have to make animal masks. And then I thought, why not make animals that represented our faith. So I chose:

  1. The Lion. The Lion is a symbol of Jesus. The lion also symbolizes bravery, nobility and strength.
  2. The Lamb. Jesus is also the Lamb. This symbolizes Jesus’ suffering and triumph over death.
  3. The Eagle. The Eagle is used to represent the apostle John. Also, the Eagle is used to represent God’s care and strength.
  4. The Fish. When Christians were persecuted during the Roman empire, they used the Fish symbol (the Ichthys) to recognize churches and other believers. Also, it was part of the feeding of the 5000.

The following are pictures of the “works in progress” for the Lamb. This one might have been the most time consuming mask because of the loops of small chains I had to make all over it. I wanted to make the mask super fluffy looking like an actual Lamb.

Here’s what the final masks look like on the singers and on my kids.

I am so ever thankful for being chosen to make these. The experience helped me think out of the box and I was able to help make this event a success. Let me know what you think of these. Which one is your favorite? Would you ever make one for yourself? Maybe for Halloween. As always, thank you for reading and have a great day!

Giant Labubu Pattern

I posted a video tutorial for the Giant Labubu on my YouTube here: Giant Labubu (Part 1); Giant Labubu (Part 2).

Materials:

  1. Bernat Blanket yarn, your choice of color.
  2. Medium worsted yarn, cream, white, black and your choice of accent color.
  3. Darning needle
  4. 3.5mm, 4mm, 5mm size hooks.
  5. Scissors
  6. Stuffing
  7. Hot glue (optional)

Head:

Rnd 1. Start with the cream color for the face. 6sc in magic circle. (6)
Rnd 2. Inc x 6. (12)
Rnd 3. (1sc. Inc.) x 6. (18)
Rnd 4. (2sc. Inc.) x 6. (24)
Rnd 5. (3sc. Inc.) x 6. (30)
Rnd 6. (4sc. Inc.) x 6. (36)
Rnd 7. (5sc. Inc.) x 6. (42)
Rnd 8. (6sc. Inc.) x 6. (48)
Rnd 9. (7sc. Inc.) x 6. (54)
Rnd 10. (8sc. Inc.) x 6. (60)
Rnd 11. (9sc. Inc.) x 6. (66)
Rnd 12. (10sc. Inc.) x 6. (72)
Rnd 13. (11sc. Inc.) x 6. (78)
Rnd 14. (12sc. Inc.) x 6. (84)
Rnd 15-17. 84sc. (84)
Rnd 18-28. Change to the Bernat Blanket yarn you chose. I chose lime green. 84sc. (84)

At this time I sewed the eyes on an embroidered on the rest. you can see how I did this in the video. Position is mentioned in the video tutorial. For the eyes, follow the video for instruction. I also show me embroidering the nose on with the accent color.

Rnd 29. (12sc. Inc.) x 6. (78)
Rnd 30. (11sc. Inc.) x 6. (72)
Rnd 31. (10sc. Inc.) x 6. (66)
Rnd 32. (9sc. Inc.) x 6. (60)
Rnd 33. (8sc. Inc.) x 6. (54)
Rnd 34. (7sc. Inc.) x 6. (48)
Rnd 35. (6sc. Inc.) x 6. (42)

Start stuffing the head now and remember to stuff along the way.

Rnd 36. (5sc. Inc.) x 6. (36)
Rnd 37. (4sc. Inc.) x 6. (30)
Rnd 38. (3sc. Inc.) x 6. (24)
Rnd 39. (2sc. Inc.) x 6. (18)
Rnd 40. (1sc. Inc.) x 6. (12)
Rnd 41. Inc x 6. (6)
FO. Sew the gap closed.

Ears (Make 2):

Rnd 1. Use a size 4mm hook for the ears. Use the Bernat Blanket yarn you chose. 8sc in magic circle. (8)
Rnd 2. Inc x 8. (16)
Rnd 3-11. 16sc. (16)
FO. Now make the inner part of the ear.

Inner Part of Ear (Make 2):

Use a 3.5mm hook.
Use the cream color medium worsted.
Row 1. Chain 8.
Row 2. 7sc starting in the second chain from the hook. (7)
Row 3-16. Chain 1. Turn. 7sc. (7)
Row 17. Chain 1. Turn. Dec. 3sc. Dec. (5)
Row 18. Chain 1. Turn. Dec. 1sc. Dec. (3)
Row 19. Chain 1. Turn. Crochet 3 stitches together (1)
FO. Sew onto the front of the ears. Line the bottoms together. Center it as well.
See video for how I did the middle blue part of the ears. This is the accent color I used. You can use a different color.

Legs (Make 2):

Rnd 1. Use a 5mm hook. Use the Bernat Blanket yarn for this. 8sc in magic circle. (8)
Rnd 2. Inc x 2. (16)
Rnd 3. (1sc. Inc.) x 8. (24)
Rnd 4. (2sc. Inc.) x 6. (30)
Rnd 5-13. 30sc. (30)

Follow the video to put the legs together.

This is the pattern for when the legs are already together and the rectangular part you made is already sewn and attached as well. We will continue from where we left of from the legs with the number of rounds.

Rnd 14-15. 54sc (54)
Rnd 16. (5sc. Inc.) x 9. (63)
Rnd 17-18. 63sc. (63)
Rnd 19. (2sc. Inc.) x 21. (84)
Rnd 20-26. 84sc. (84)
Rnd 27. (5sc. Dec.) x 14. (70)
Rnd 28-30. 70sc. (70)
Rnd 31. (5sc. Dec.) x 10. (60)
Rnd 32-34. 60sc. (60)

Don’t forget to stuff along the way. Make sure to put a good amount of stuffing so she can stand.

Rnd 35. (4sc. Dec.) x 10. (50)
Rnd 36. (3sc. Dec.) x 10. (40)
Rnd 37. (2sc. Dec.) x 10. (30)
Rnd 38. (4sc. Dec.) x 6. (24)
Rnd 39. (3sc. Dec.) x 6. (18)
Rnd 40. (2sc. Dec.) x 6. (12)
Rnd 41. (1sc. Dec.) x 6. (6)
FO. Sew gap closed.

Hands: Follow the pattern for the hands in the video. You can either sew the hands into the arm holes or glue them. Gluing them didn’t work as well. I sewed them on instead. Since you are using medium worsted yarn to sew the hands into the arms, you won’t see the seams as much because the Bernat Blanket yarn is so thick, it hides the yarn in its fluffiness.

Feet (Make 2):

Rnd 1. Use cream color medium worsted for this. 6sc in magic circle. (6)
Rnd 2. Inc x 6. (12)
Rnd 3. (1sc. Inc.) x 6. (18)
Rnd 4. (2sc. Inc.) x 6. (24)
Rnd 5. (3sc. Inc.) x 6. (30)
Rnd 6. (4sc. Inc.) x 6. (36)
Rnd 7. (5sc. Inc.) x 6. (42)
Rnd 8. (6sc. Inc.) x 6. (48)
Rnd 9. Crochet in the back loops only here. 48sc. (48)
Rnd 10. (6sc. Inc.) x 6. (42)
Rnd 11. (5sc. Inc.) x 6. (36)
Rnd 12. (4sc. Inc.) x 6. (30)
Rnd 13. (3sc. Inc.) x 6. (24)
Rnd 14. (2sc. Inc.) x 6. (18)
Rnd 13. (1sc. Inc.) x 6. (12)
Rnd 12. Inc x 6. (6)
FO. Sew gap closed.
Please watch the video on how to make the toes. There are three on each foot. Then, same with the hands, you can either sew or glue them on. I sewed them on.