

Key:
Rnd – Round
FO – Finish Off
St – Stitch
Sc – Single Crochet
Inc – Increase meaning 2sc in one stitch
Dec – Decrease meaning crocheting 2 stitches together
BLO – Back Loop Only
Materials:
- 1 skein of medium worsted yarn. I used Red Heart Super Saver in Coffee.
- 4mm hook. I used the Tulip brand.
- Darning needle. I used Clover Chibi.
- Scissors. I used two kinds, one for the yarn and a sturdy large one for the zipper.
- A zipper of your choice. I got mine off of Amazon.
- Black shank buttons.
- Thread to help you put yarn through the back of the buttons
Head:
Rnd 1. 6sc in magic circle. (6)
Rnd 2. Inc x 6. (12)
Rnd 3. (1sc. Inc.) x 6. (18)
Rnd 4. (2sc. Inc.) x 6. (24)
Rnd 5. (3sc. Inc.) x 6. (30)
Rnd 6. (4sc. Inc.) x 6. (36)
Rnd 7. (5sc. Inc.) x 6. (42)
Rnd 8. (6sc. Inc.) x 6. (48)
Rnd 9. BLO. 48sc. (48)
Rnd 10-14. 48sc. (48)
Rnd 15. (7sc. Inc.) x 6. (54)
Rnd 16-19. 54sc. (54)
Rnd 20. (2sc. Dec.) x 13. 2sc. (41)
Rnd 21. (1sc. Dec.) x 13. 2sc. (28)
Rnd 22. (1sc. Dec.) x 9. 1sc. (19)
Rnd 23. (1sc. Dec.) x 6. 1sc. (13)
Rnd 24. 12sc. We are skipping the last stitch. (12)
Rnd 25. Chain 1. Inc x 12. (24)
Rnd 26-32. Chain 1. 24sc. (24)
Rnd 33. Chain 1. (7sc. Inc.) x 3. (27)
Rnd. 34-36. Chain 1. 27sc. (27)
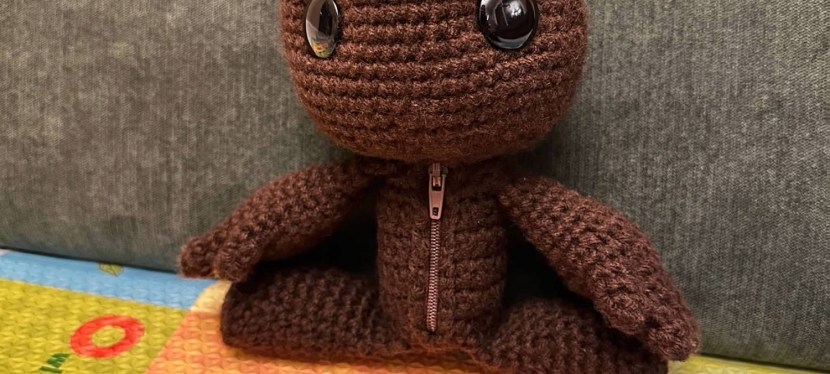
At this point sew the zipper on. Make sure that your zipper is the right size. If it’s not the right size, cut it shorter. I used a backstitch to sew it on.
Rnd 37. BLO. Dec x 13. 1sc. (15)
Rnd 38. Dec x 7. 1sc (9)
Rnd 39. Dec x 3. (6)
Finish off here and sew any gap closed. Weave in the ends.
Hands (make 2):
Start with the fingers. There will be 10 fingers in total. The thumb will be 1 row less than the rest of the fingers.
Rnd 1. 4sc in magic circle. (4)
Rnd 2-5. 4sc. (4)
Finish off for the first 3 fingers. Do not finish off for the fourth finger because you will continue to crochet onto the other fingers from here. Please watch the video for more clarity. Take any finger and crochet 2sc. Then take another finger and crochet 2sc. Take the last finger and crochet 4sc. Then continue onto the next finger as you crochet around the hand. Crochet into the next 6sc. You should have a total of 16 stitches. This is Rnd 6. Place a marker here.
Rnd 7. 16sc. (16)
Rnd 8. This is where you connect the thumb. The thumb is the same as the other fingers but with one less row. Continue to crochet onto the thumb with 4sc. You should have a total of 20sc. Do 1sc to completely join the thumb. Add a marker here.
Rnd 9. 20sc.
Rnd 10. 20sc.
Rnd 11. (2sc. Dec.) x 5. (15)
Rnd 12. (3sc. Dec.) x 3. (12)
Rnd 13-19. 12sc. (12)
Stuff the arm. Flatten the arm. See what this looks like in the video. Crochet both layers together. Chain 1. 6sc. FO. Then sew the arm onto the body with a whip stitch at Rnd 24 of the head/body. Position the arm about 3 stitches away from the zipper.
Leg (make 2):
Rnd 1. 8sc in magic circle. (8)
Rnd 2. Inc x 8. (16)
Rnd 3. BLO. 16sc. (16)
Rnd 4-8. 16sc. (16)
Rnd 9. (6sc. Dec.) x 2. (14)
Rnd 10-13. 14sc. (14)
Stuff the leg. Flatten the leg like you did with the arm. Chain 1. 7sc through both layers. FO and sew onto the body. Sew the leg on the BLO row of the body at the bottom. Make sure that the leg lines up with the arm.
For the eyes, please see the video for clearer instructions. Position the middle of the buttons 10-11 stitches apart. Insert them between Rnds 14 and 15 of the head. The total height of your doll is approximately 9.5 inches.
