

Materials you will need:
1.Brown, cream, blue, white yarn.
2.Buttons for eyes
3.Any zipper of your choice.
4.Red felt for the bow.
5.Scissors
6.Colored pencil for the “blushies”
7.A regular needle and sewing thread
8.U.S. size F crochet hook.
9.Stuffing
10. Fabric glue
Head and body:
1.With cream yarn. 6sc in magic circle. For those who do not know how to make a magic circle, please watch my video here: http://www.youtube.com/watch?v=V3-JpqvgMXo Or, you can make a circle starting with a slip knot: Ch 2. 6sc in second ch from hook. [6]
2.2sc in each st around. [12]
3.(1sc in first st. 2sc in next st.) 6X [18]
4.(1sc in first 2 st. 2sc in next st.) 6X [24]
5.(1sc in first 3 st. 2sc in next st.) 6X [30]
6.(1sc in first 4 st. 2sc in next st.) 6X [36]
7.(1sc in first 5 st. 2sc in next st.) 6X [42]
8.(1sc in first 6 st. 2sc in next st.) 6X [48]
9.1sc in each st around. For 2 rows. Only in the back loops. [48]
10.1sc in each st around. For 10 rows. [48]
11.(1sc in first st. Sc2tog.) 16X [32]
12.(1sc in first st. Sc2tog.) Repeat until you are left with 10 st. [10]
13.Stuff the head at this point before continuing on to make the body
14.2sc in each st around. [20]
15.Chain 1. Turn work. 1sc in the next 19 st. For 3 rows. [19]
16.Change to white yarn. Chain 1. Turn work. 1sc in each st. For 7 rows. [19]
17.Sew on the zipper before finishing the body.
18.Only in the back loops. Sc2tog around.
19.Sc2tog until gap is small enough to sew closed.
20.FO.
Arms (Make 2):
1.With white yarn. Pick up 6 stitches where the legs should be. Do this in a circular fashion so you can make the normal shape of a sackboy leg. If you need more instruction on this part please watch my video on picking up stitches here: http://www.youtube.com/watch?v=Sm9xuh2Onh8 [6]
2.2sc in each st around. [12]
3.Change to blue yarn. 1sc in each st around. [12]
4.Change to white yarn. 1sc in each st around. [12]
5.Change to light brown yarn. 1sc in each st around. For
6.Change to light brown yarn. (1sc in the first st. 2sc in the next st.) 6X [18]
7.1sc in each st around. [18]
8.Stuff before you make the fingers.
9.Create five fingers. If you need help please view my video on creating fingers here: http://www.youtube.com/watch?v=Sm9xuh2Onh8 The fingers should be about 4-5 stitches each and 3-4 rows in length.
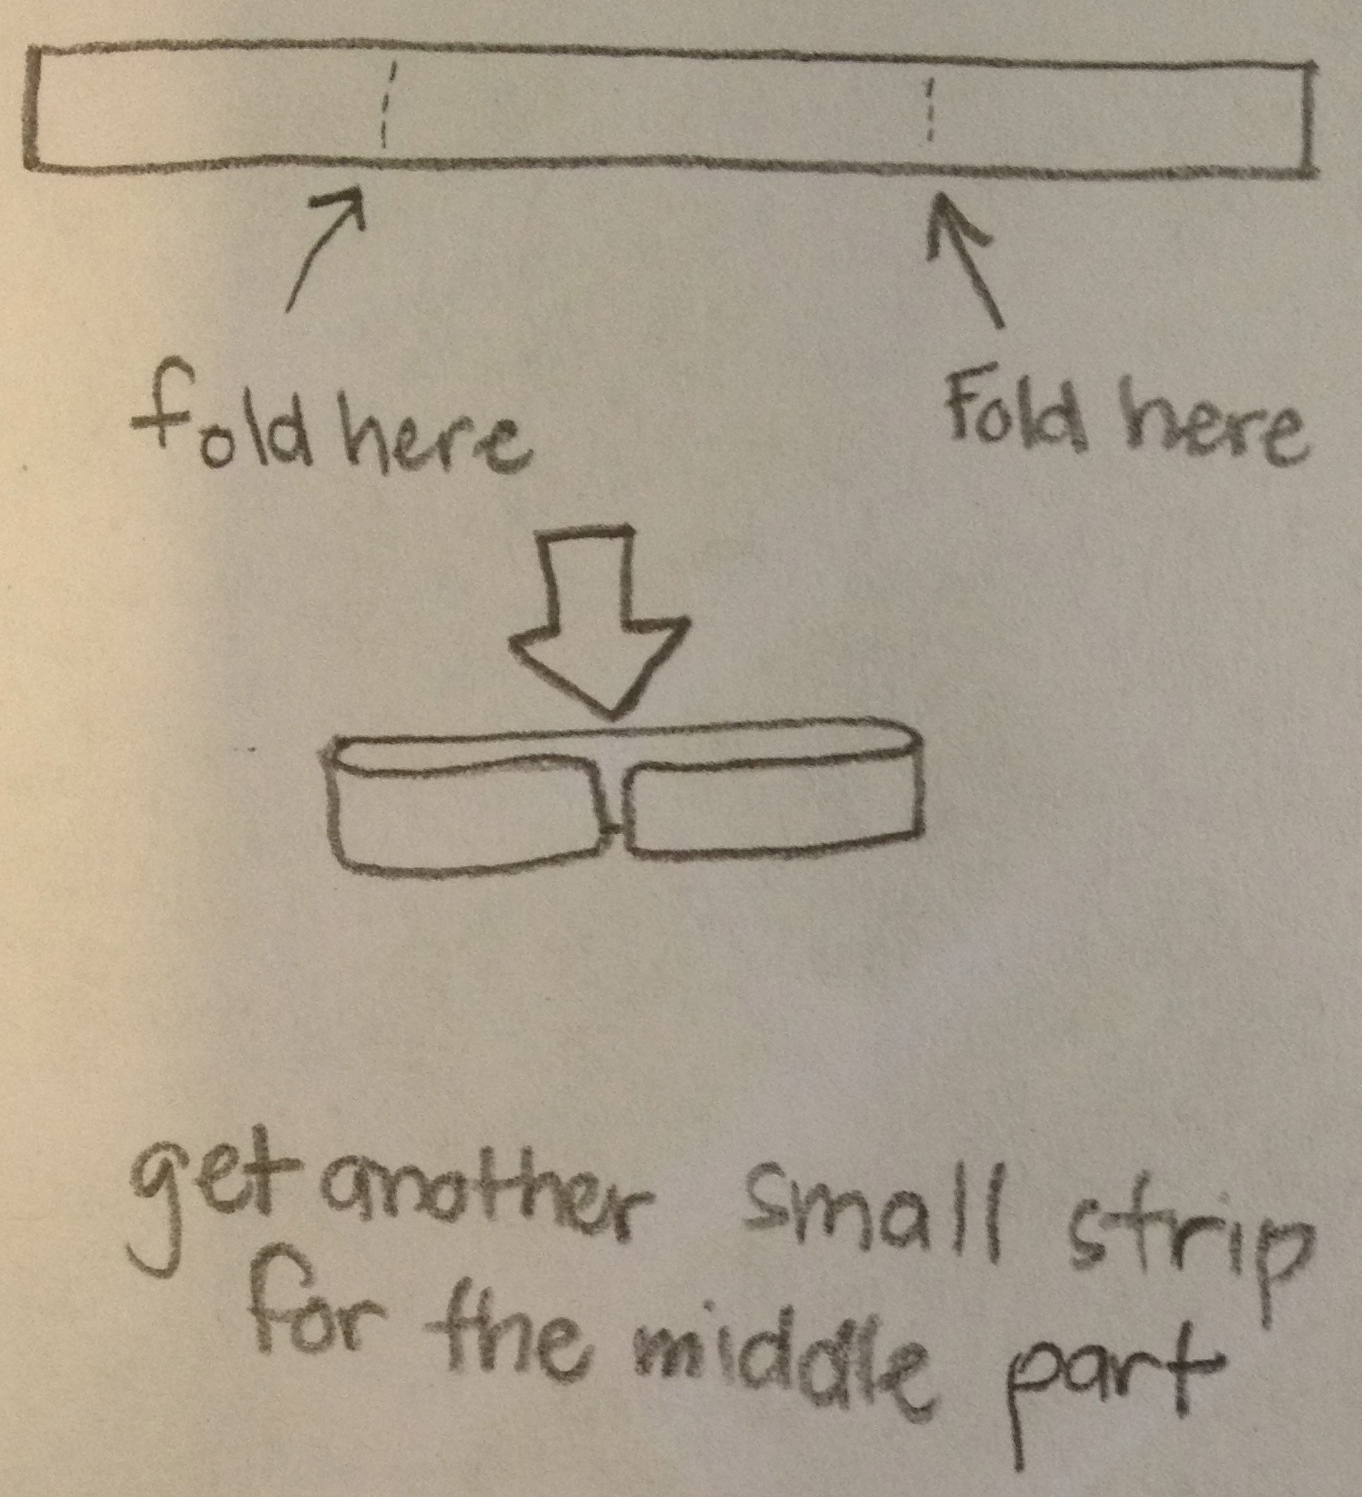
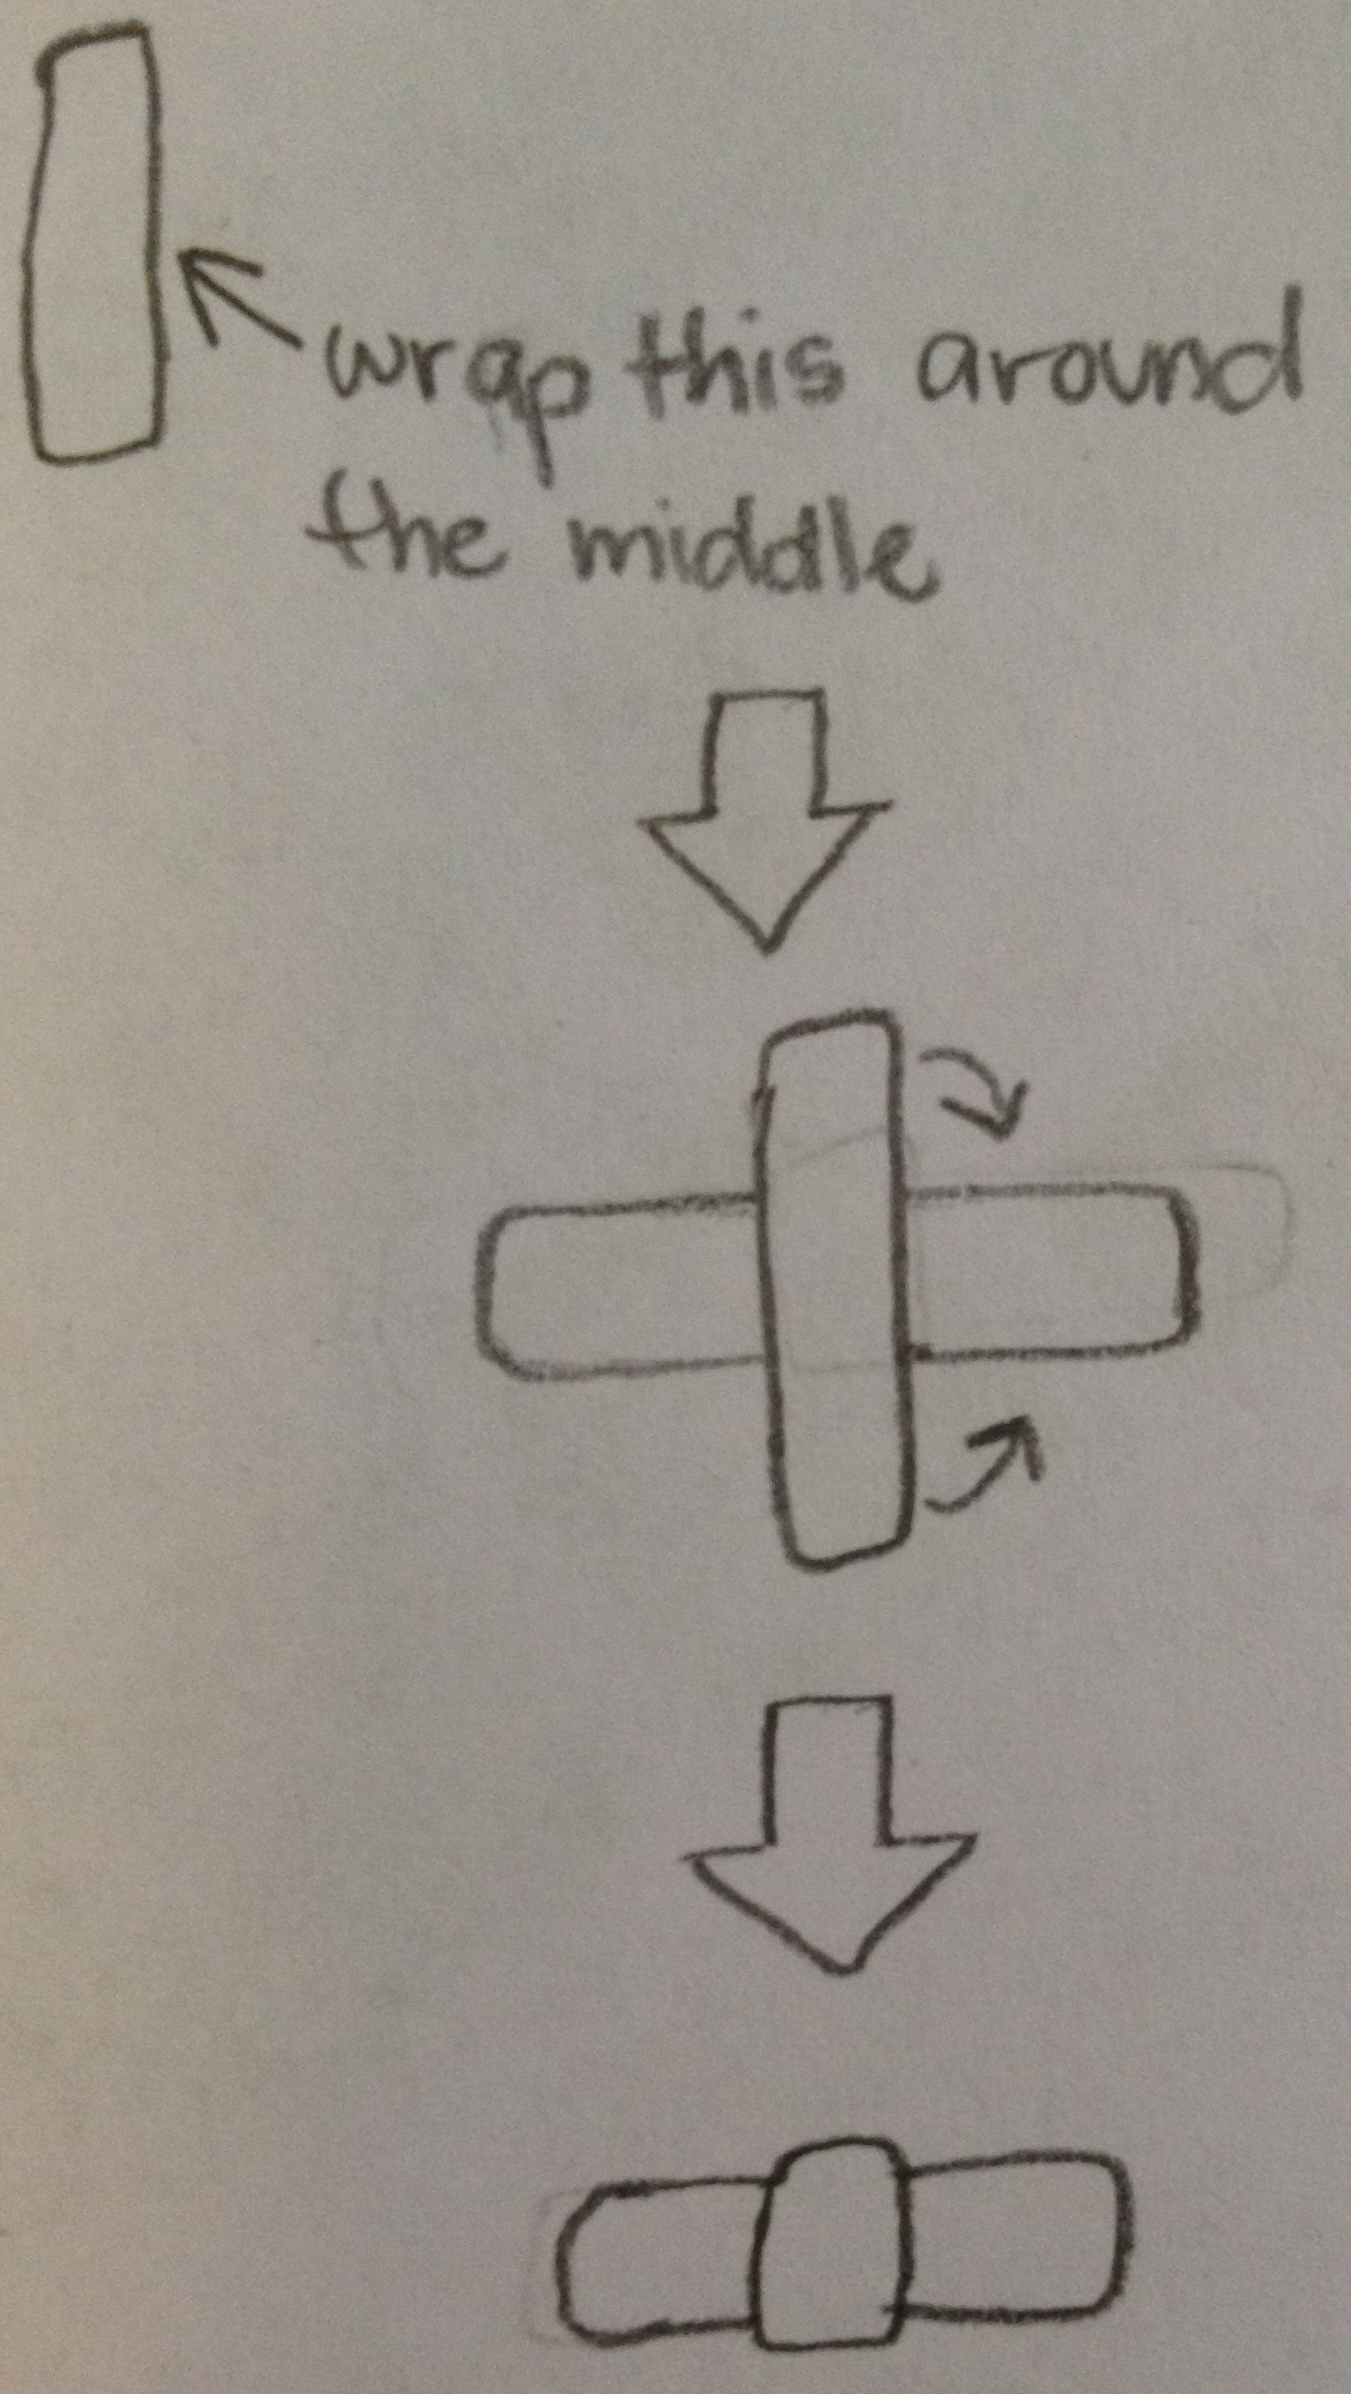
Blue handkerchief:
1.With blue yarn. Ch 16.
2.1sc in each chain starting in the second one from hook. [15]
3.Chain 1. Turn work. 1sc in first st. Change to white yarn. 1sc in the next 13 st. Change to blue yarn. 1sc in last st. [15]
4.Chain 1. Turn work. 1sc in first st. Change to white yarn. 1sc in next st. Change to blue yarn. 1sc in the next 11 st. Change white yarn. 1sc in next st. Change to blue yarn. 1sc in last st. For 3 rows. [15]
5.Chain 1. Turn work. 1sc in first st. Change to white yarn. 1sc in next st. Change to blue yarn. 1sc in the next 2 st. [4]
6.Chain 1. Turn work. 1sc in the first 2st. Change to white yarn. 1sc in next st. Change to blue yarn. 1sc in the last st. [4]
7.Repeat step 5. [4]
8.Chain 1. Turn work. Sc2tog. Change to white yarn. 1sc in next st. Change to blue yarn. 1sc in the last st. [3]
9.Chain 1. Turn work. 1sc in first st. Change to white yarn. 1sc in next st. Change to blue yarn. 1sc in last st. For 2 rows. [3]
10.Chain 1. Turn work. Sc3tog. [1]
11.Chain 1. Turn work. 1sc in st. [1]
12.FO.
9.With blue yarn. Insert a slip knot through the fourth stitch. Chain 2. 1sc in next st. Change to white yarn. 1sc in next st. Change to blue yarn. 1sc in last st. The Chain 2 is going to be counted as 1st. [4]
10.Chain 1. Turn work. 1sc in first st. Change to white yarn. 1sc in next st. Change to blue yarn. 1sc in the “Chain 2” you did in step 9. [4]
15.Repeat step 6. [4]
16.Chain 1. Turn work. 1sc in first st. Change to white yarn. 1sc in next st. Change to blue yarn. Sc2tog. [3]
17.Repeat step 9-12.
18.Sew this on the doll as seen in the picture.

Legs (Make 2):
1.With light brown yarn. Pick up 7 stitches where the legs should be. Do this in a circular fashion so you can make the normal shape of a sackboy leg. If you need more instruction on this part please watch my video on picking up stitches here: http://www.youtube.com/watch?v=Sm9xuh2Onh8 [7]
2.2sc in each st around. [14]
3.1sc in each st around. For 3 rows. [14]
4.Change to white yarn. 1sc in each st around. For 2 rows. [14]
5.Change to brown yarn. 1sc in each st around. For 2 rows. [14]
6.Stuff. Sc2tog until gap is small enough to sew closed.
7.FO.
Skirt:
1.With blue yarn. Pick up 20 stitches around the waist.
2.(1sc in first 3 st. 2sc in next st.) 5X [25]
3.1sc in each st around. [25]
4.(1sc in first 4 st. 2sc in next st.) 5X [30]
5.1sc in each st around. For 2 rows. [30]
6.FO.
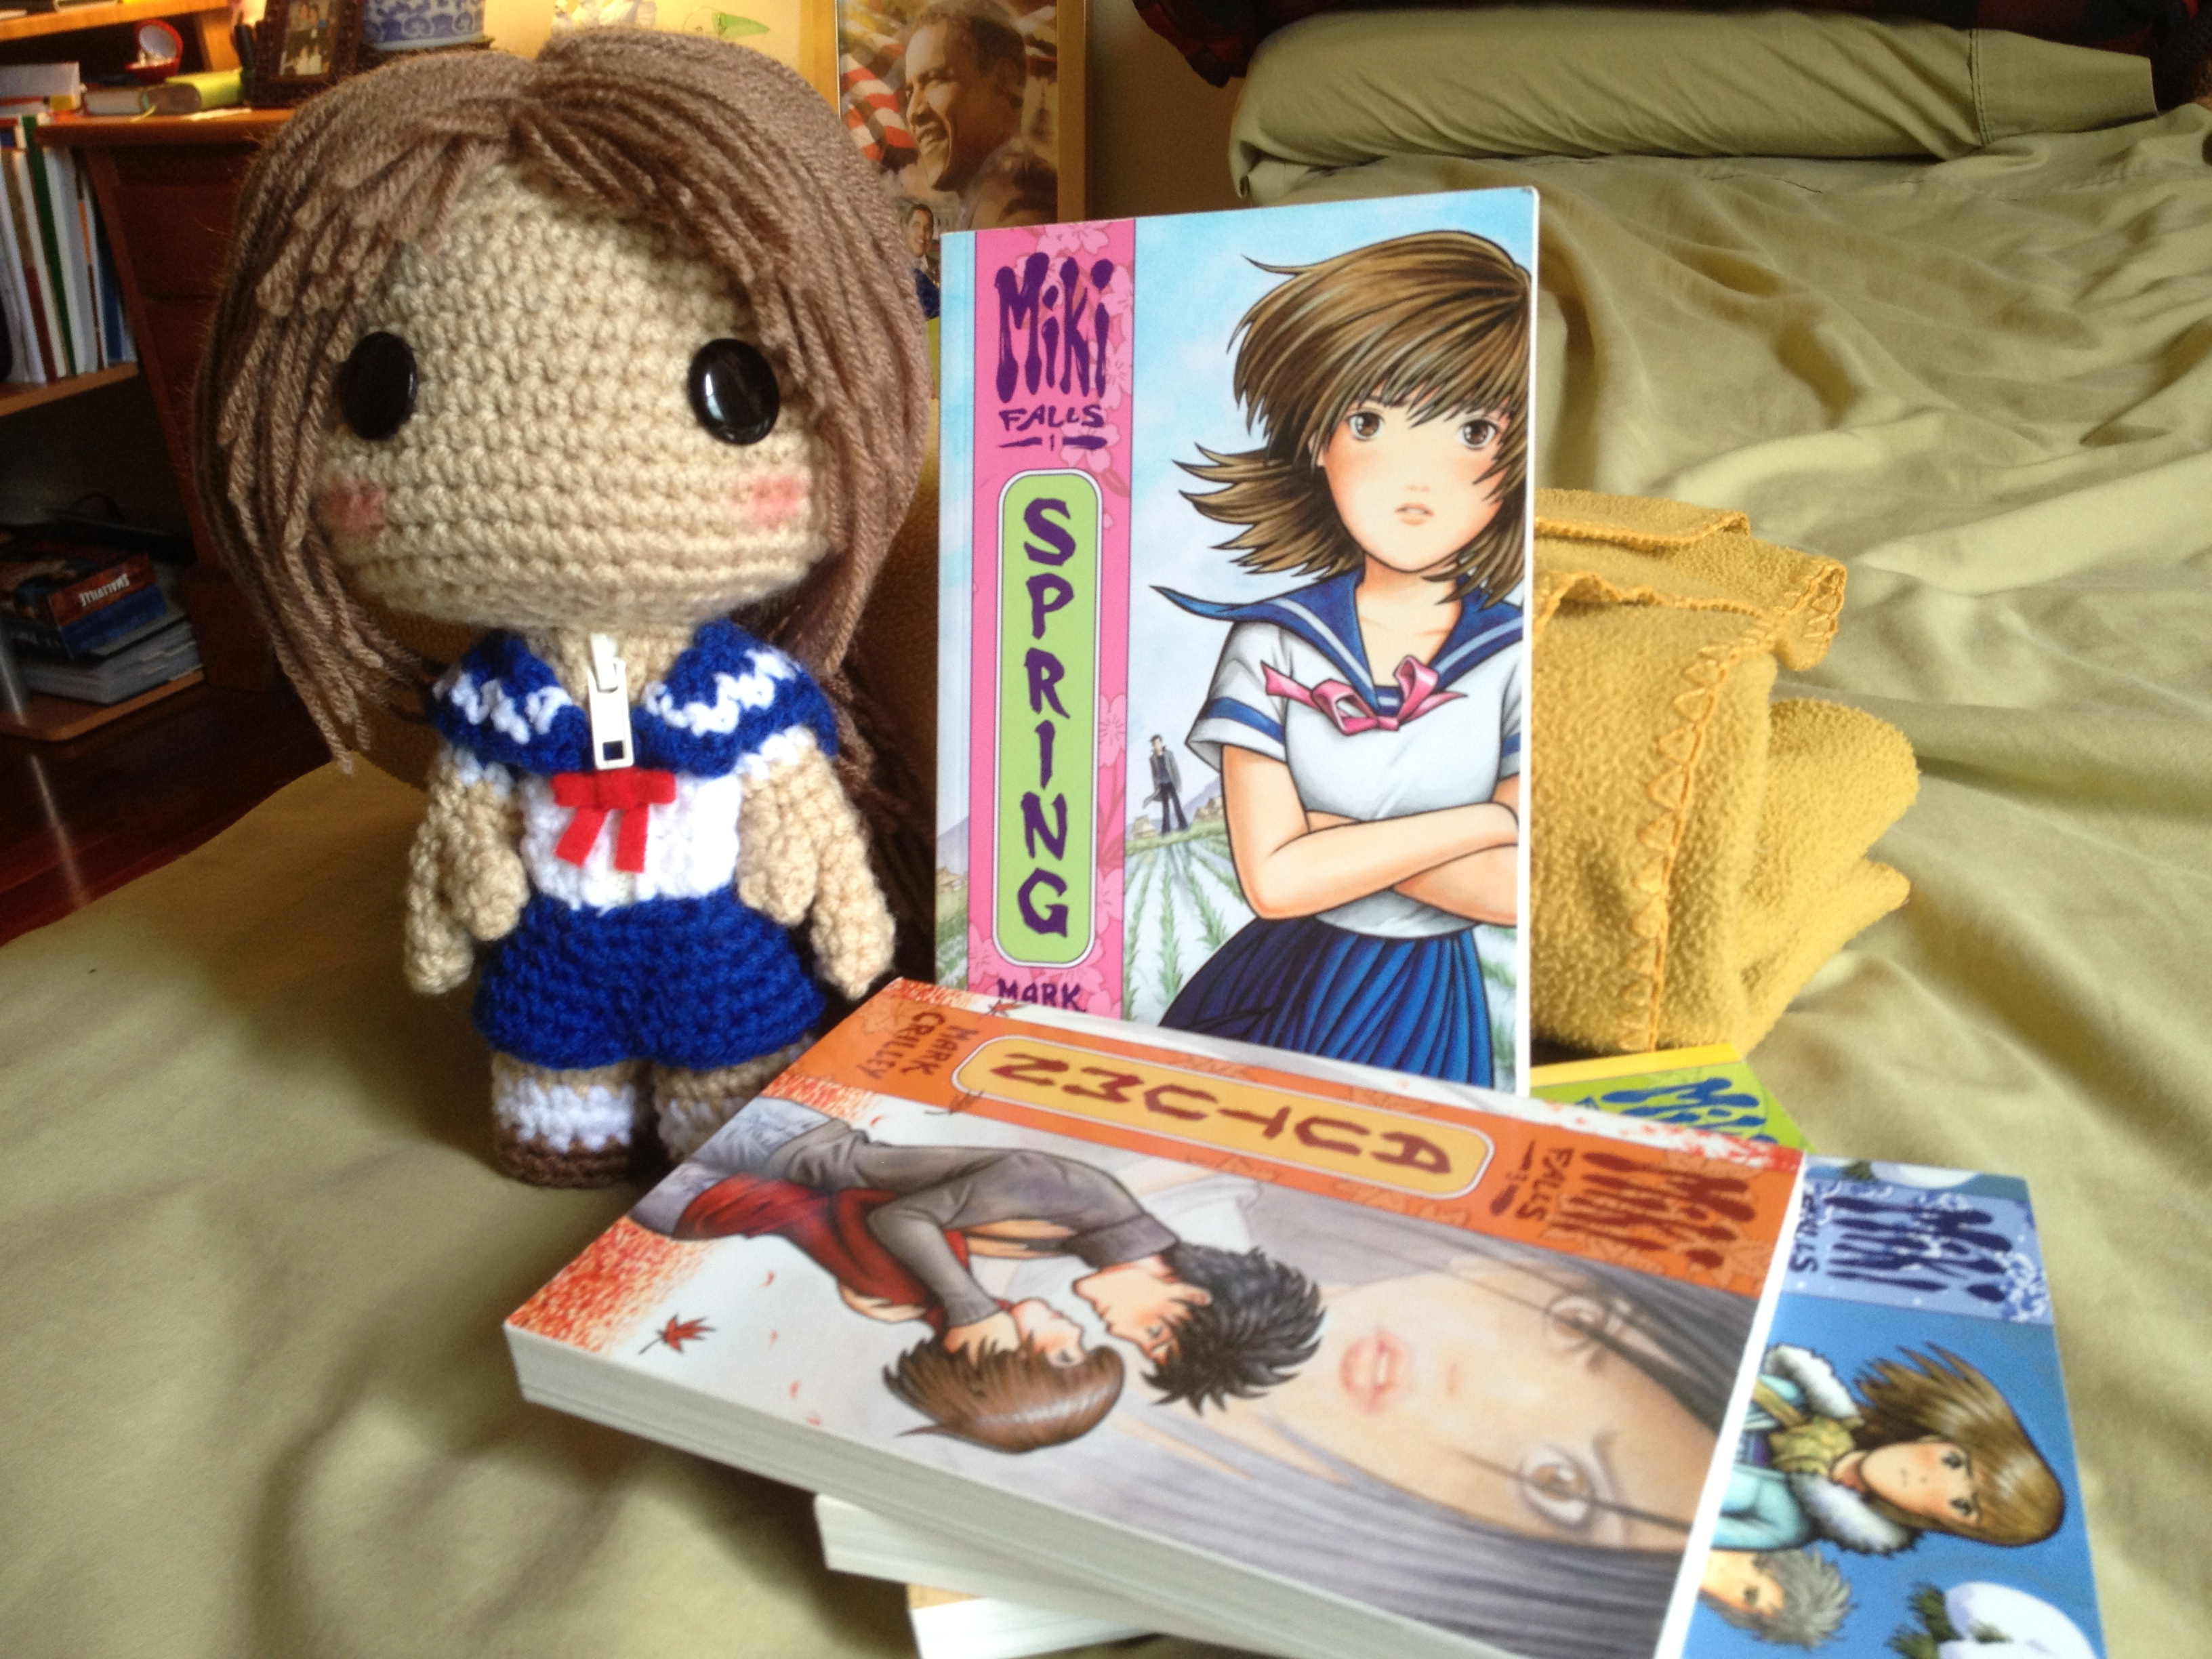
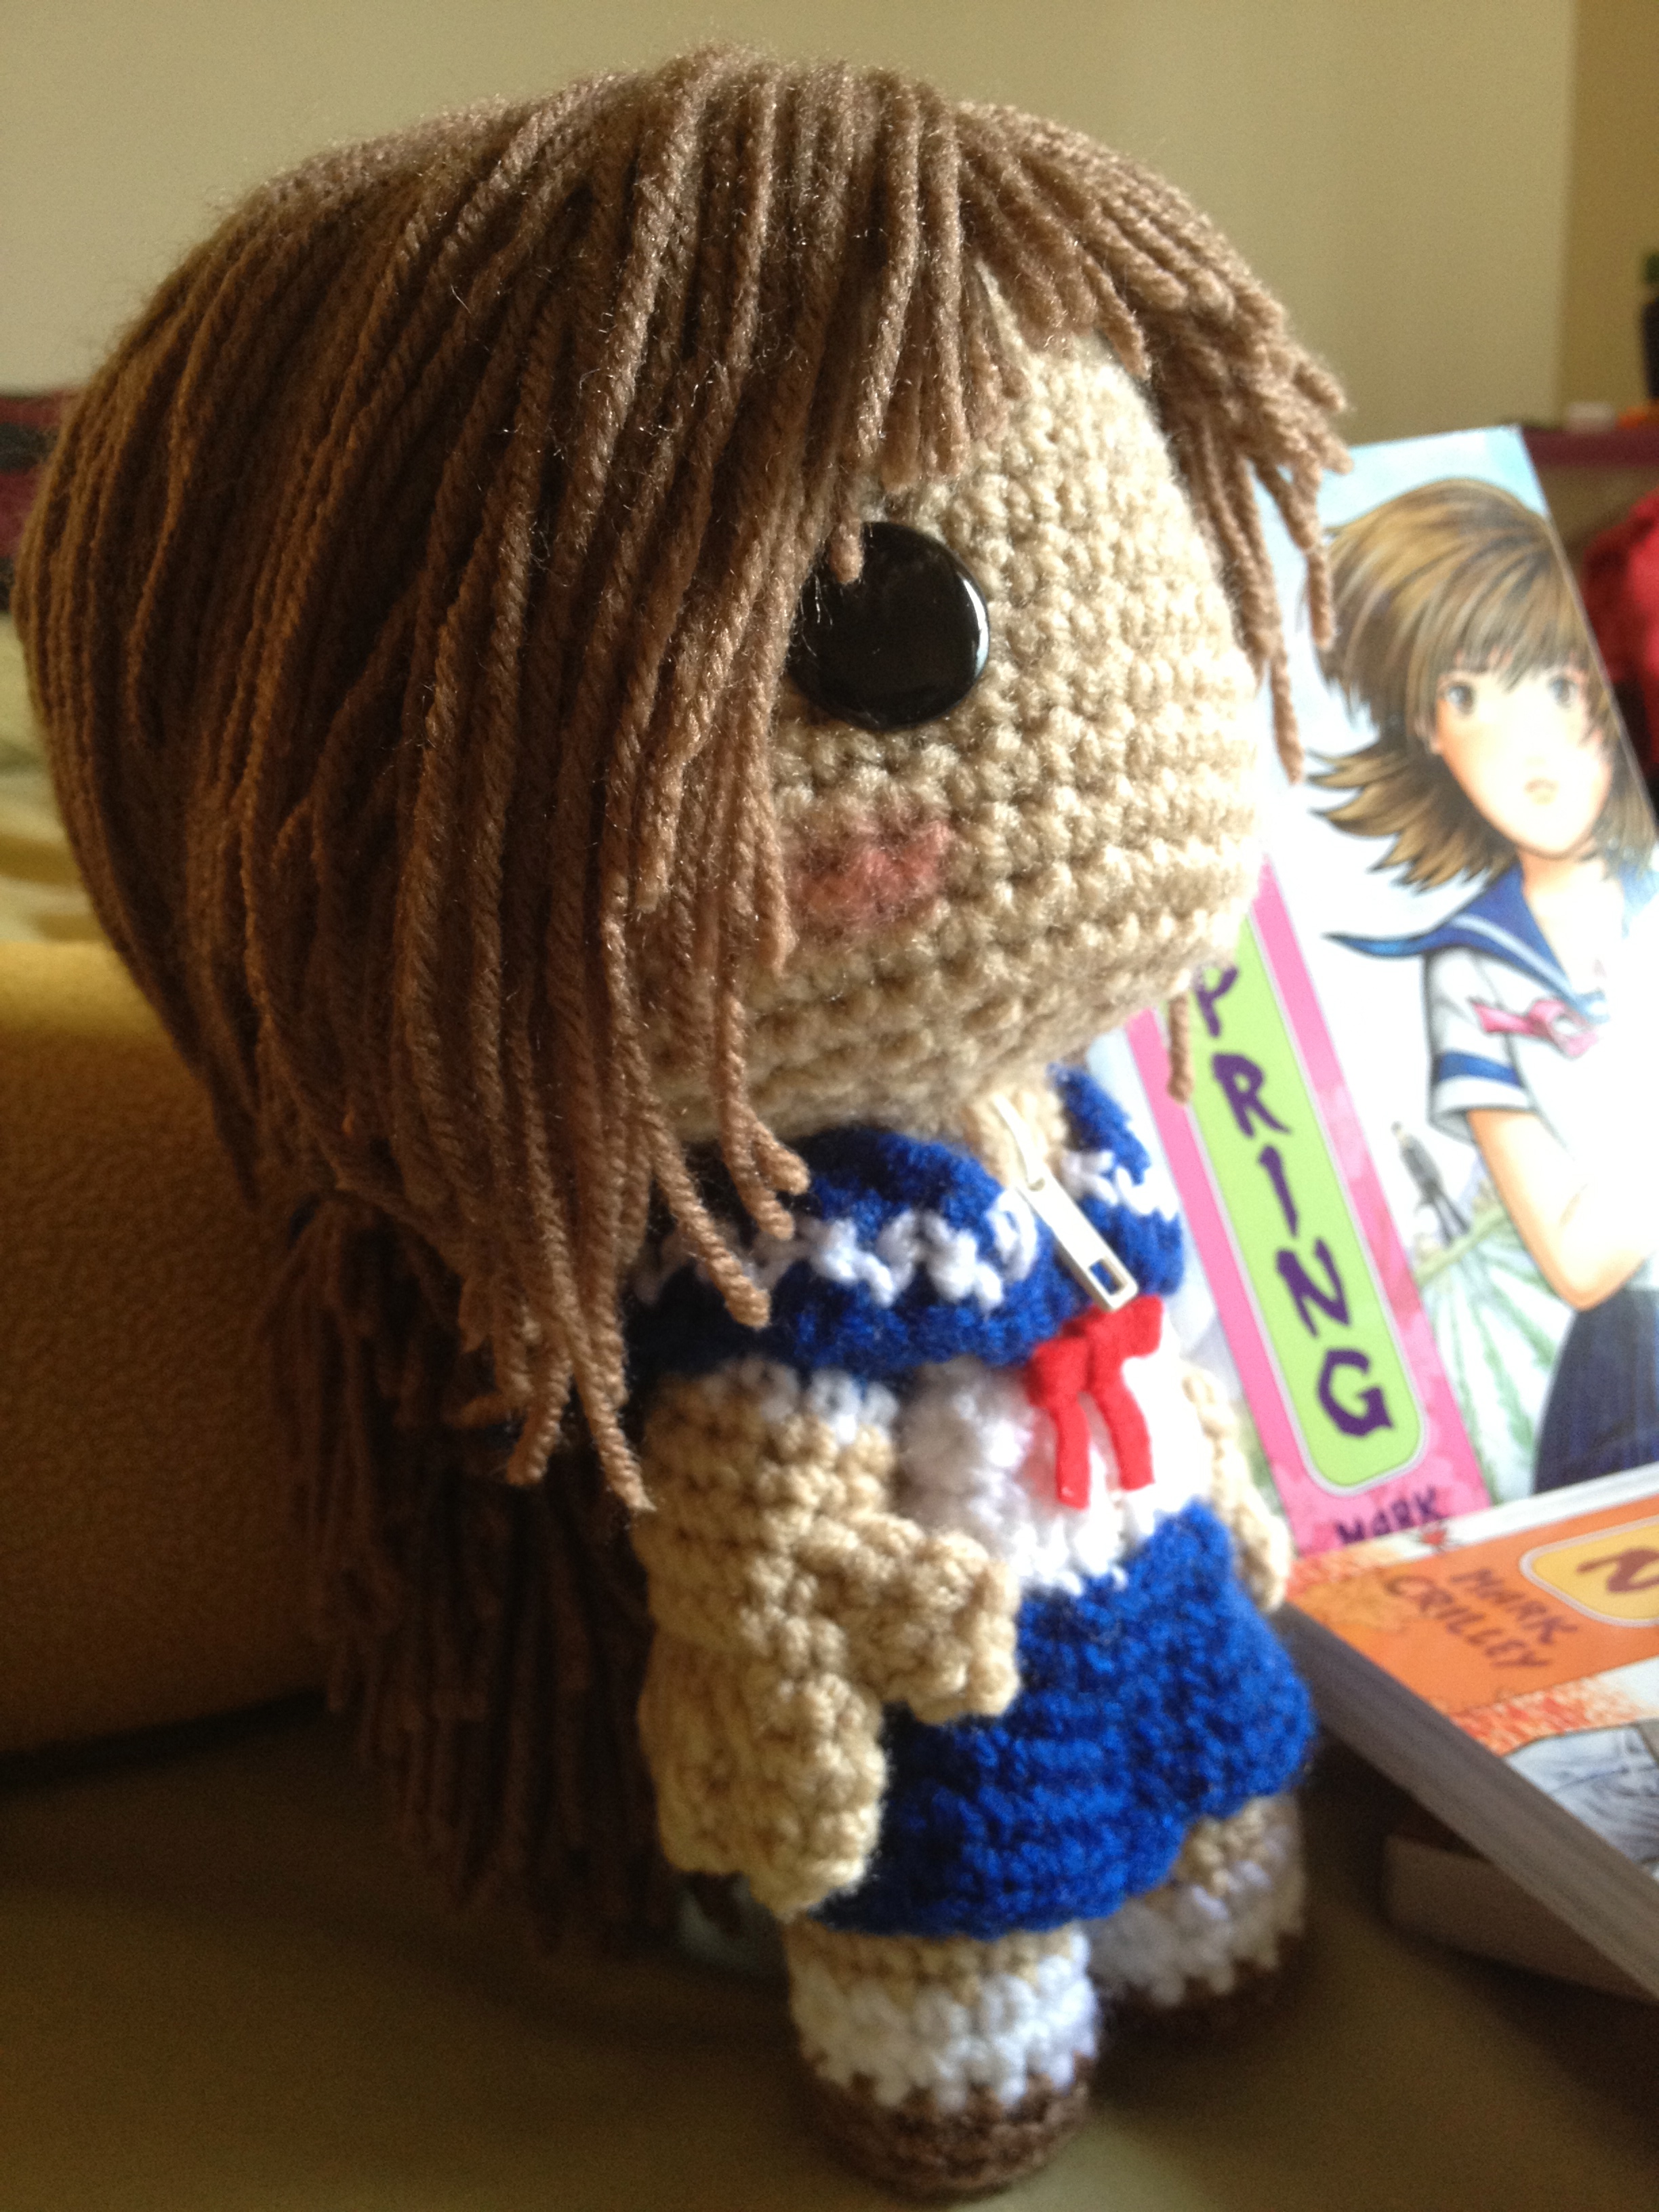
Hair:
1.Follow the instructions for the hair as shown in my L sackboy video: http://www.youtube.com/watch?v=32SINLoVhII
2.Try to cut the yarn longer than how you want the finished product to look. After you have attached all the hair, you can cut the yarn.
3.For my doll, I tried to give her a layered look for the front pieces of hair.
4.Try not to cut the yarn too short or else those pieces will stick out and will not look right.
5.Miki’s hair is long, but with yarn, it is hard to work with it when it is that short so I decided to make her hair longer. I also used a piece of yarn to keep her hair tied so it woudn’t be all over the place.
Red bow:
1.Use red or pink felt to make the bow.
2. Use fabric glue to glue the pieces together.

“Blushies”:
1.Use a pinkish/redish colored pencil of your choice.
2.Stain her cheeks just below her eyes with the color.

Hey, I really wanna know how to make it, but I don’t know anything about yarn. What is sc, st, FO… and what is the meaning of the numbers in here… [ ]. Please help me!!!
LikeLike
I have an intro video up on my youtube page. I actually have two. I want to have more in the future but I still need to get a new camera which I will hopefully get at the end of this year.
Video 1: http://www.youtube.com/watch?v=gEtthIpniXg
Video 2: http://www.youtube.com/watch?v=-oaGsFXFSvA
LikeLike
Thank you. Keep up the good job!!
LikeLike
Hello my name is Monja and I’m from Germany. I’d really like to make this doll, I don’k know how to do that. My aunt could make it,but she doesn’t understand this manuel.
Could you help me or simplify this manuel? Thank you very much.
LikeLike
Sc., means single stitch. And fo means finish off. I’m just learning myself.
LikeLike
Btw, it’s an incredible doll, loved it!!!
LikeLike
How long will it take exactly? I really want to try to make one but unfortunately I don’t have much time on my hands
LikeLike
It took me about 2 days to make this doll, give or take a few hours.
LikeLike
Wow impressive 2 days to make a doll like that it will take YEARS for me to understand and find about what is what. o(╥﹏╥)o
LikeLike
Okay, thanks 🙂
LikeLike
Your doll is totally amazing you are great at it
Seriously I LOVE MARK CRILLEY he is AWSOME AT DRAWING
LikeLike
I finally finished making it! https://sphotos-a.xx.fbcdn.net/hphotos-ash3/562541_10151378657787073_1182284477_n.jpg I totally understand what you meant about the doll having a lot of hair. SO MUCH HAIR! lol Thank you for the pattern GJB! 🙂 Now on to making superman…
LikeLike
Omg I totally love how you did the hair. Looks so much better than mine. She looks so cute 🙂
LikeLike
Thank you! 🙂 I spent like a month making it. It was my first sackdoll, and I gave it away as a birthday gift. It was so hard to cut the bangs. I was just snipping randomly so I thought to just tie it. I think one of the more tricky steps for me was the blue handkerchief because of all the color switches and hiding the loose ends. The hands were probably the most difficult though. How did you get the thumb not to point so right-angled?
LikeLike
The loose end from the thumb can be pulled into the inner part of the arm. Kinda try to pull the yarn in the direction you want the thumb to be facing. For the loose ends of the yarn for the hand I pull them into the palm and secure them here. It helps me shape the fingers so that they are not all sticking out. Then I hide the loose ends after that. I hope this helps 🙂
LikeLike
Thanks for the tips! ^^
LikeLike
I cannot crovhet but can you do a knotting one in thick wool?
LikeLike
do we need to put the zipper on?
LikeLike
on the handkercheif you put 9 and 10 instead of 13 and 14
LikeLike
Can you make a pocoyo sack boy (look it up on google images) plz, my little bro will want one to go to sleep with please sell me or make a tutorial or pattern plz. LOVE YOUR ART/SACKBOYS YOU ARE TRULY AWESOME SAUCE AND U
LikeLike
WOW! I can hardly wait to do your pattern for Miki Falls. And I can hardly wait to see your video when you get your new camera. I was notified thru another site that I watch too…amigurumi to go. She also does lovely work. I was wondering if you could tell me the weight of the yarn and what brand you used? That is always crucial to know. Thank you and many blessings to you.
LikeLike
What kind of eyes did you use for this? The look flatter and bigger than the typical saftely eyes. Do you know if a hobby lobby would have these sort of eyes? I’m looking into making this, but it looks complicated from the pattern. I’ve been making amigurumi for almost a year now, but haven’t made any sackboys yet. They look so kawaii though. Thanks
LikeLike
Would it be alright if I use the body head arm and leg patterns to sell at a craft fair.
LikeLike
To make my own dolls.
LikeLike
For copy right reasons. Sorry if it gets annoying.
LikeLike
Well I’m not making the same clothes hair of eyes and I’m using a bunch of different colors so mabye never mind. It would be nice if you can answer me Golden jellybean this week. Thank you.
LikeLike
Oops I was supposed to be sending this to another website. Sorry.
LikeLike
On Miki pattern,for the arms line#5. You write change yarn light brown yarn.sc in eachst around. For…… For how many rows . what does the For mean?????
LikeLike